Overview
A Space enables users to save the current context for quick access later.
A context includes the current entity type, applied filters, search criteria, visualization layout, etc. By saving a context as a Space, users can quickly return to a frequently used view without reapplying filters or search criteria.
Using Spaces, users can:
- Save the current context.
- Save applied filters and search criteria.
- Save the selected visualization layout.
- Quickly access frequently used entity context.
- Pin important Spaces to the left navigation panel for quick access.
Accessing Spaces
To access a Space, follow these steps:
- Log in to the Dataspace instance.
- Click Spaces from the left navigation pane. The Spaces page is displayed with all available Spaces.
- Click the desired Space. You will be redirected to the saved space.
Sections of the Spaces Page
The Spaces page contains the following sections:
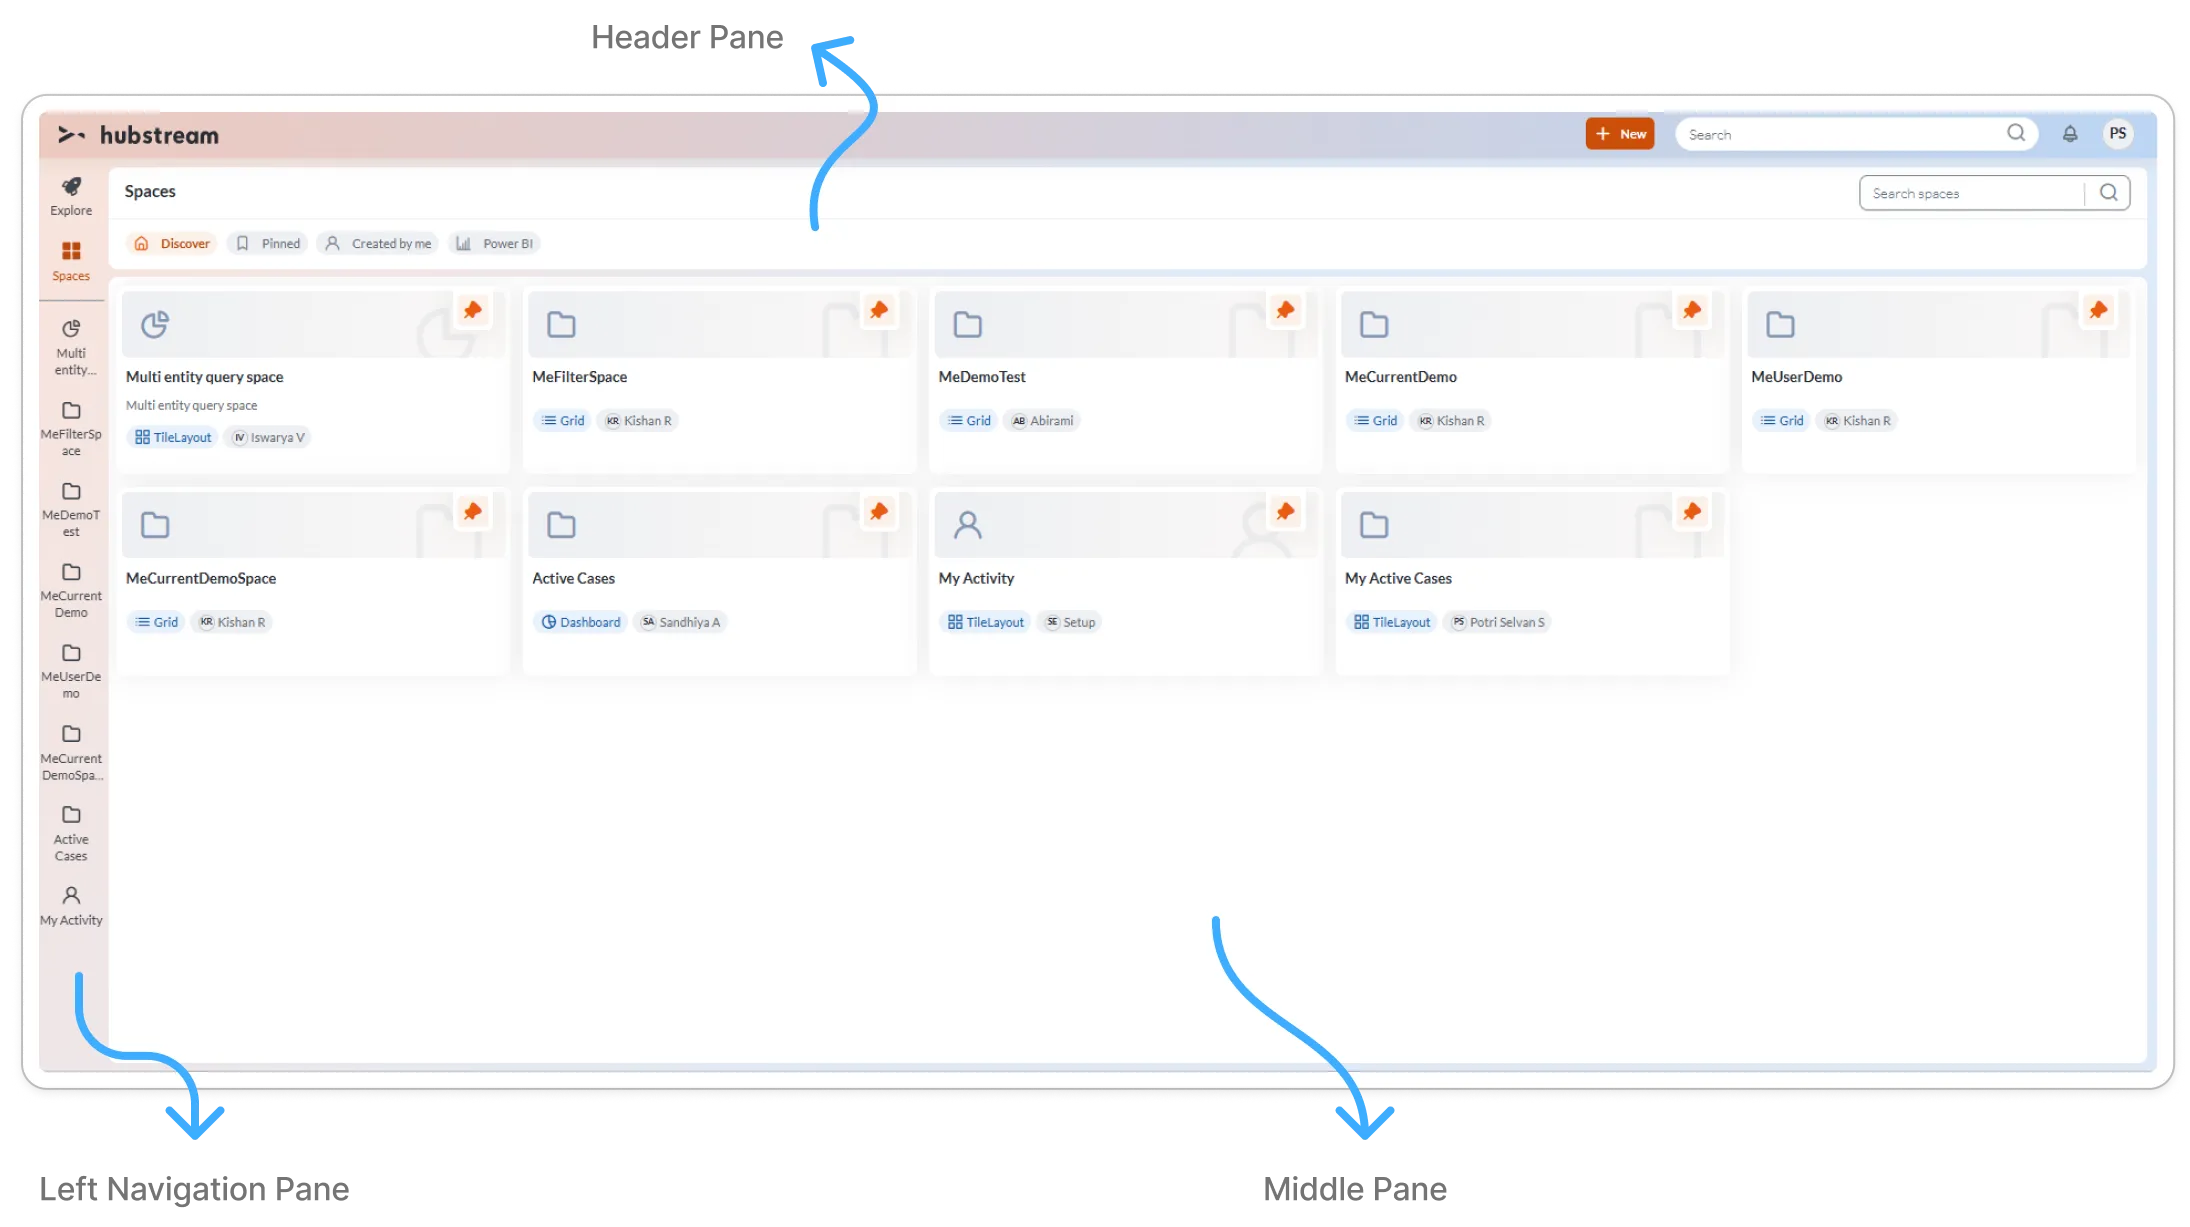
Header
Displays the Spaces page title and the Search Spaces option.
Header Actions
- Discover – Displays all available spaces as individual tiles, including Pinned, Created by Me, and Power BI Spaces.
- Pinned – Displays all pinned spaces. These are the spaces shown in the left navigation panel. If a space is unpinned, it will be removed from the left navigation panel but will still be accessible from Discover section.
- Created by Me – Shows a list of spaces that you have created.
- Power BI – Shows a list of Power BI reports as a space.
- Search Spaces – Allows you to search for a specific space by entering the Space name in the search bar.
Space Tiles
Displays the available Spaces as tiles.
Each Space tile displays:
- Icon – Displays the icon selected for the saved Space.
- Space Name – Displays the name of the saved Space.
- Description – Displays the description provided for the Space.
- Layout Tag – Displays the visualization layout associated with the Space (for example, Grid, Tile Layout, or Dashboard).
- Created By – Displays the name of the user who created the Space.
- Pin Icon – Indicates whether the Space is pinned.
Clicking a Space tile opens the saved context with applied filters and visualization.
Left Navigation Pane
Displays pinned Spaces for quick access.
Users can select a pinned Space from the left navigation pane to directly open the saved Spaces without navigating to the Spaces page.
Add as a Space
To create a space from the current entity, follow these steps.
Note: You cannot create Spaces from the Explore page. The Add as Space action is disabled on that page.
Steps:
- Navigate to the desired entity that you access frequently.
- Apply the required filters or spotlight as required.
- Switch to the preferred visualization as required.
- Click Add as Space. An Add as Space pop-up form will appear on the screen.
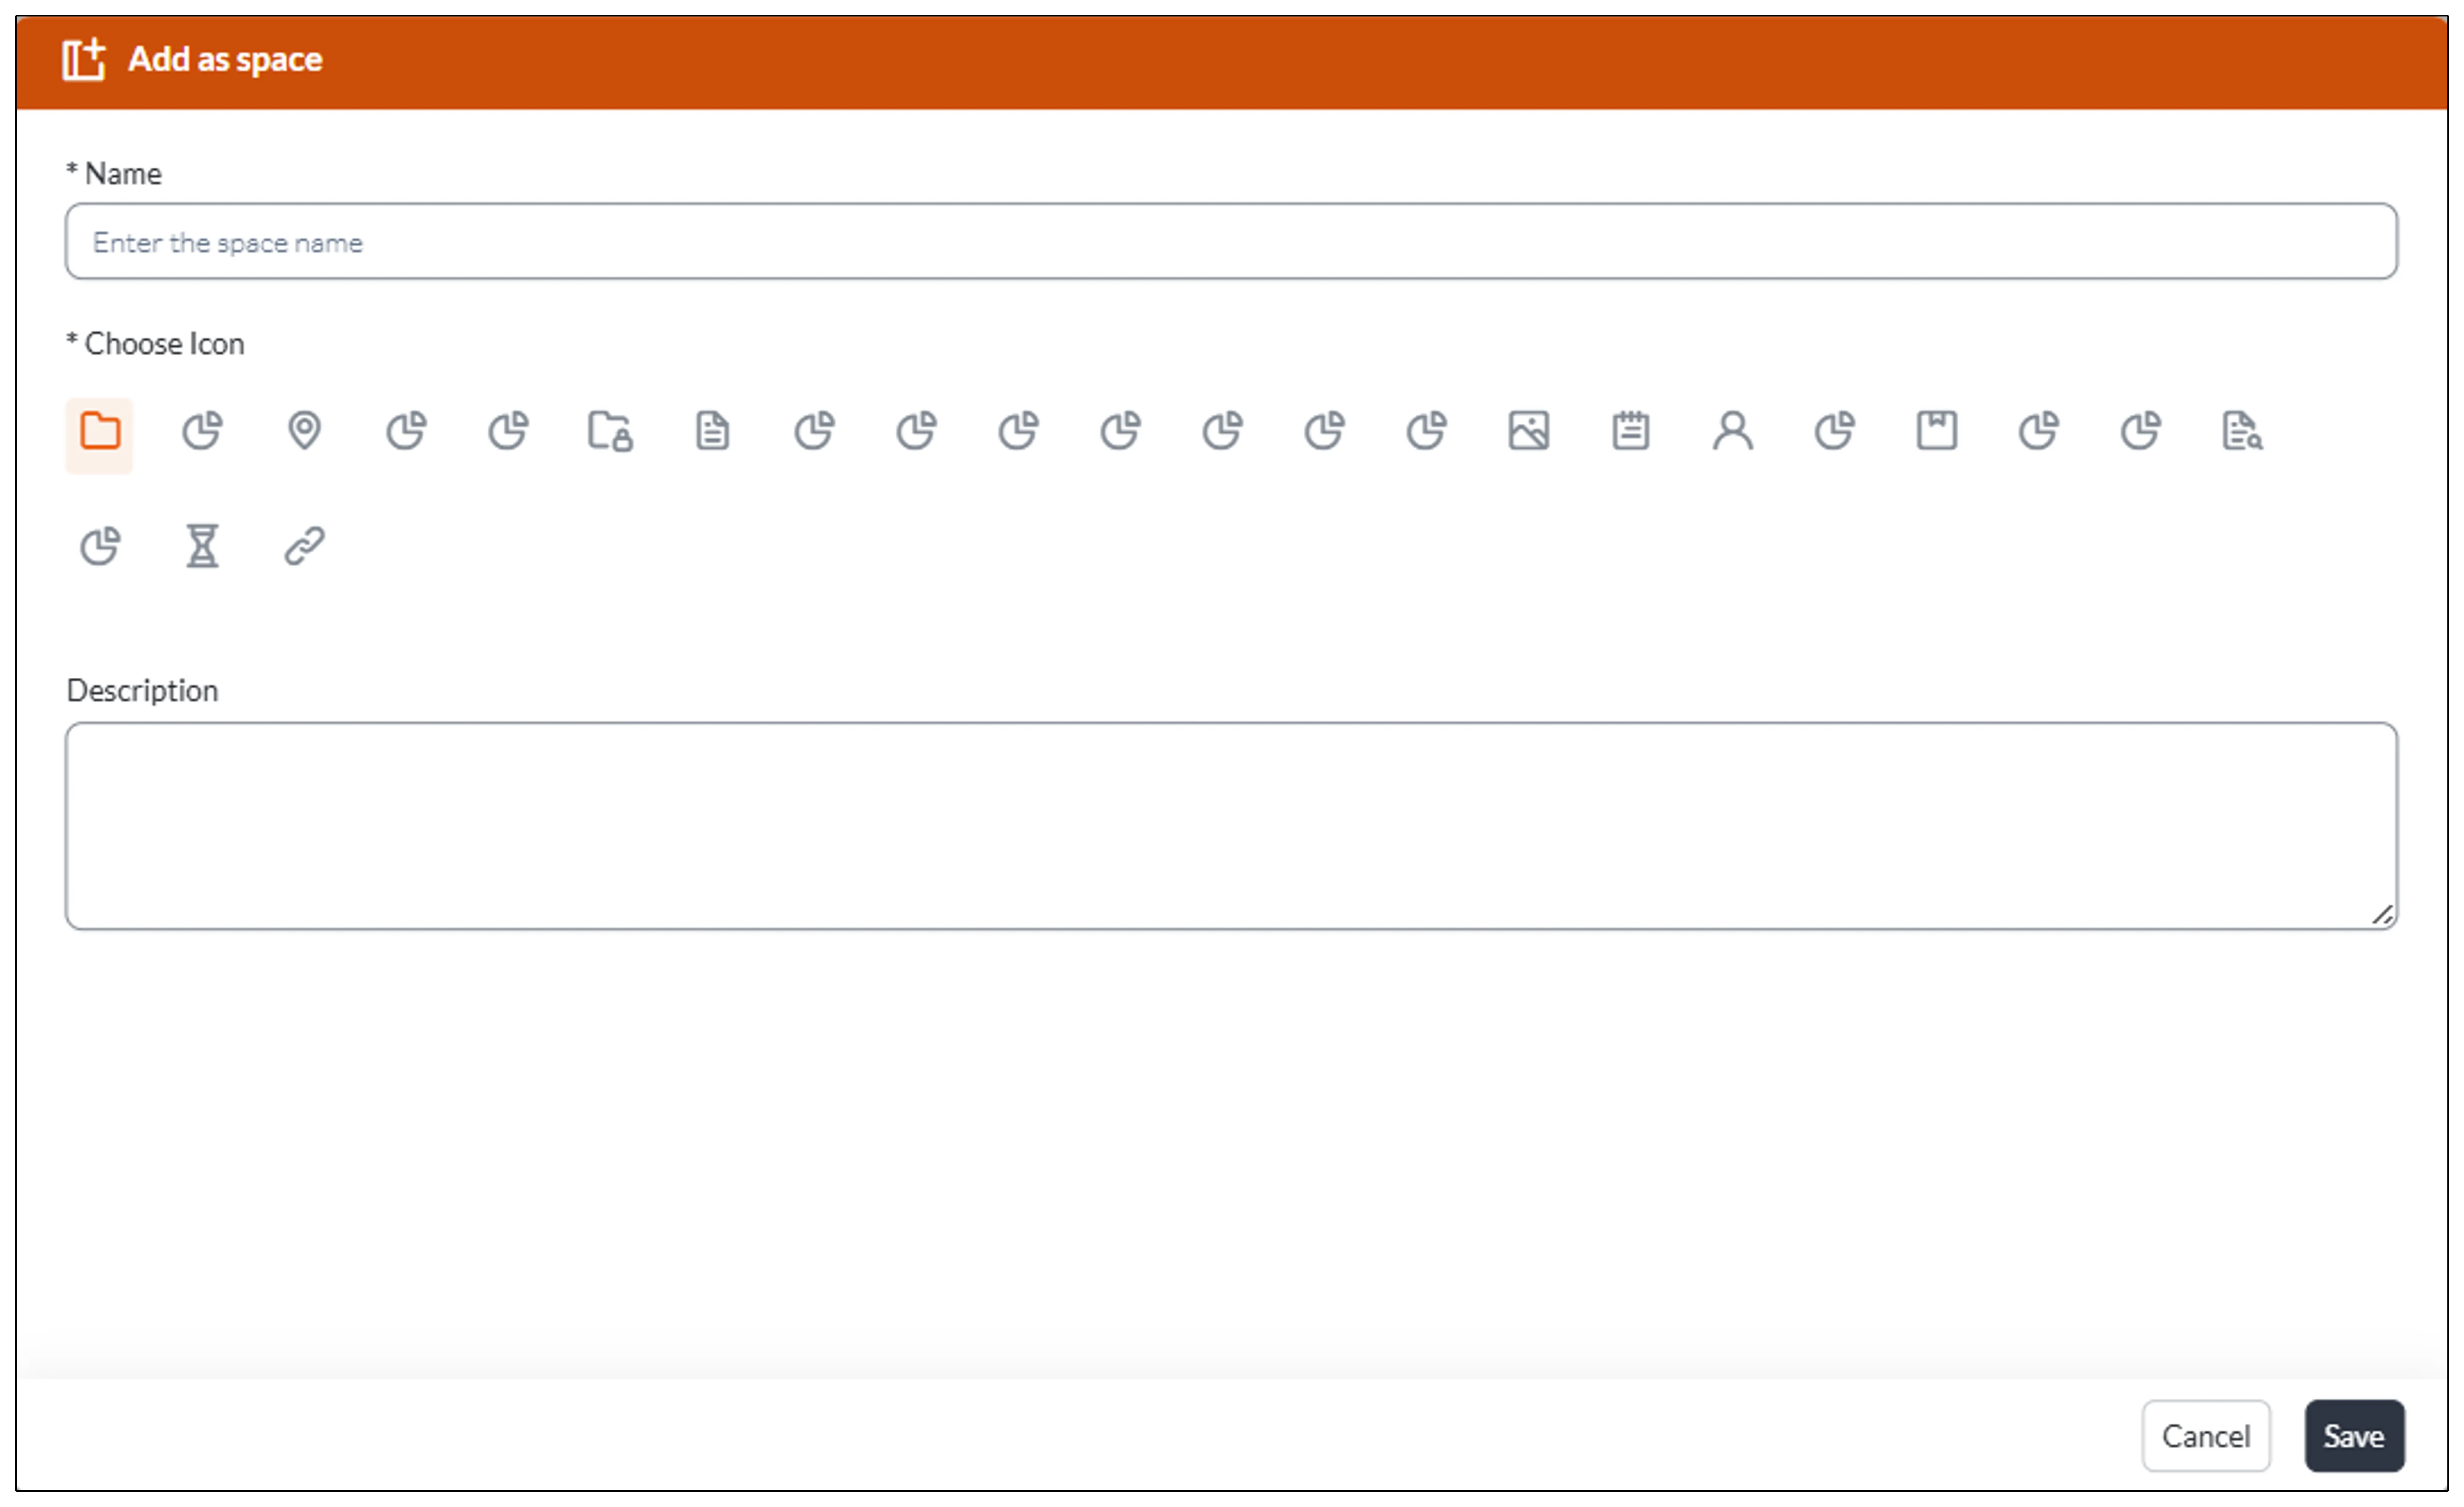
- Enter a Space name.
- Select the required icon.
- Enter a Description.
- Click Save.
Expected Outcome
A new Space is created and displayed on the Spaces page. By default, the Space is pinned and displayed in the left navigation pane for quick access.
Note: User-created Spaces are visible only to the user who creates them. Default platform Spaces, such as My Activity, are displayed based on the user’s role and access permissions.
Edit a Saved Space
You can open a saved Space, modify the context and save the changes as a new Space.
Steps
- Navigate to the Spaces page.
- Open the required Space.
- Apply the required filters or search criteria or spotlight as required.
- Select a different visualization layout.
- Click Add as Space. A popup form will appear.
Note: You can open a saved Space and modify the context by applying different filters or selecting a different visualization layout. However, changes made to an existing Space cannot be saved back to that Space. To preserve the updated context, you can add a new Space.
- Enter a new Space name.
- Select the required icon.
- Enter a description.
- Click Save.
Expected Outcome
- A new Space is created with the updated context.
- The original Space remains unchanged.
- The new Space is displayed on the Spaces page.
- By default, the new Space is pinned and displayed in the left navigation pane.
Pin or Unpin a Space
To pin or unpin a spaces, follow these steps.
Steps
- Navigate to the Spaces page.
- Search for or locate the required space (e.g., Pending Cases).
- Click the Pin icon.
- To unpin the space, click the Pin icon again.
Expected Outcomes
When a Space is pinned:
- The Pin icon is highlighted.
- The Space is added to the Pinned tab.
- The Space is displayed in the left navigation pane for quick access.
When a Space is unpinned:
- The Pin icon returns to its default appearance.
- The Space is removed from the Pinned tab.
- The Space is removed from the left navigation pane.
- The Space remains available on the Discover tab.
Examples
In this example, we demonstrate how to create a new space for the current query context.
Scenario 1:
An investigator frequently reviews Active Cases in the cases entity page. The investigator wants to save this query context for future use.
Steps:
- Navigate to Explore page.
- Open the Cases entity page.
- Navigate to the filters pane.
- Select Active in the Status filter.
- Click Add as Space. A popup form will appear.
- Enter Active Cases as the Space name.
- Select the required icon.
- Enter a Description (eg. Active cases are included in this space)
- click Save.
Expected Outcome
- An Active Cases space is created.
- The saved Space is displayed on the Spaces page. The space tile displays the Space name, icon, description and layout type.
- By default, the Space is pinned and displayed in the left navigation pane for quick access.
- Clicking the Space redirects to a page saved with the list of Active cases.
Scenario 2:
An investigator frequently reviews High Priority Leads using the Tile layout. The investigator wants to save the query context for future use.
Steps
- Open the Leads entity page.
- Select High in the Priority filter.
- In the top-right corner, select Tile as the visualization layout.
- Click Add as Space.
- Enter the Space name. (e.g. Leads Tile View)
- Select the required icon.
- Enter a description. (e.g. High priority leads are displayed in Tile view)
- Click Save.
Expected Outcome
- A Leads Tile View Space is created.
- The saved Space is displayed on the Spaces page.
- By default, the Space is pinned and displayed in the left navigation pane.
- The Space card displays the space name, icon, description and layout type.
- Opening the Space restores the High priority Leads entities in Tile layout visualization.
Scenario 3:
An investigator frequently reviews his Assigned Tasks using the Grid layout. The investigator wants to save the query context for future use.
Steps
- Open the Tasks entity page.
- Select @Me in the Assigned To filter.
- In the top-right corner, select Grid as the visualization layout.
- Click Add as Space.
- Enter the Space name. (e.g. My Assigned Tasks)
- Select the required icon.
- Enter a description. (e.g. Assigned tasks are displayed in Grid view)
- Click Save.
Expected Outcome
- An Assigned Tasks Space is created.
- The saved Space is displayed on the Spaces page.
- By default, the Space is pinned and displayed in the left navigation pane.
- The Space card displays the space name, icon, description and layout type.
- Opening the Space restores the saved context, including the Assigned To = @Me filter and Grid visualization.
- As a result, only the tasks assigned to the current user are displayed, allowing the user to quickly review and access their assigned tasks without reapplying filters or switching the visualization.