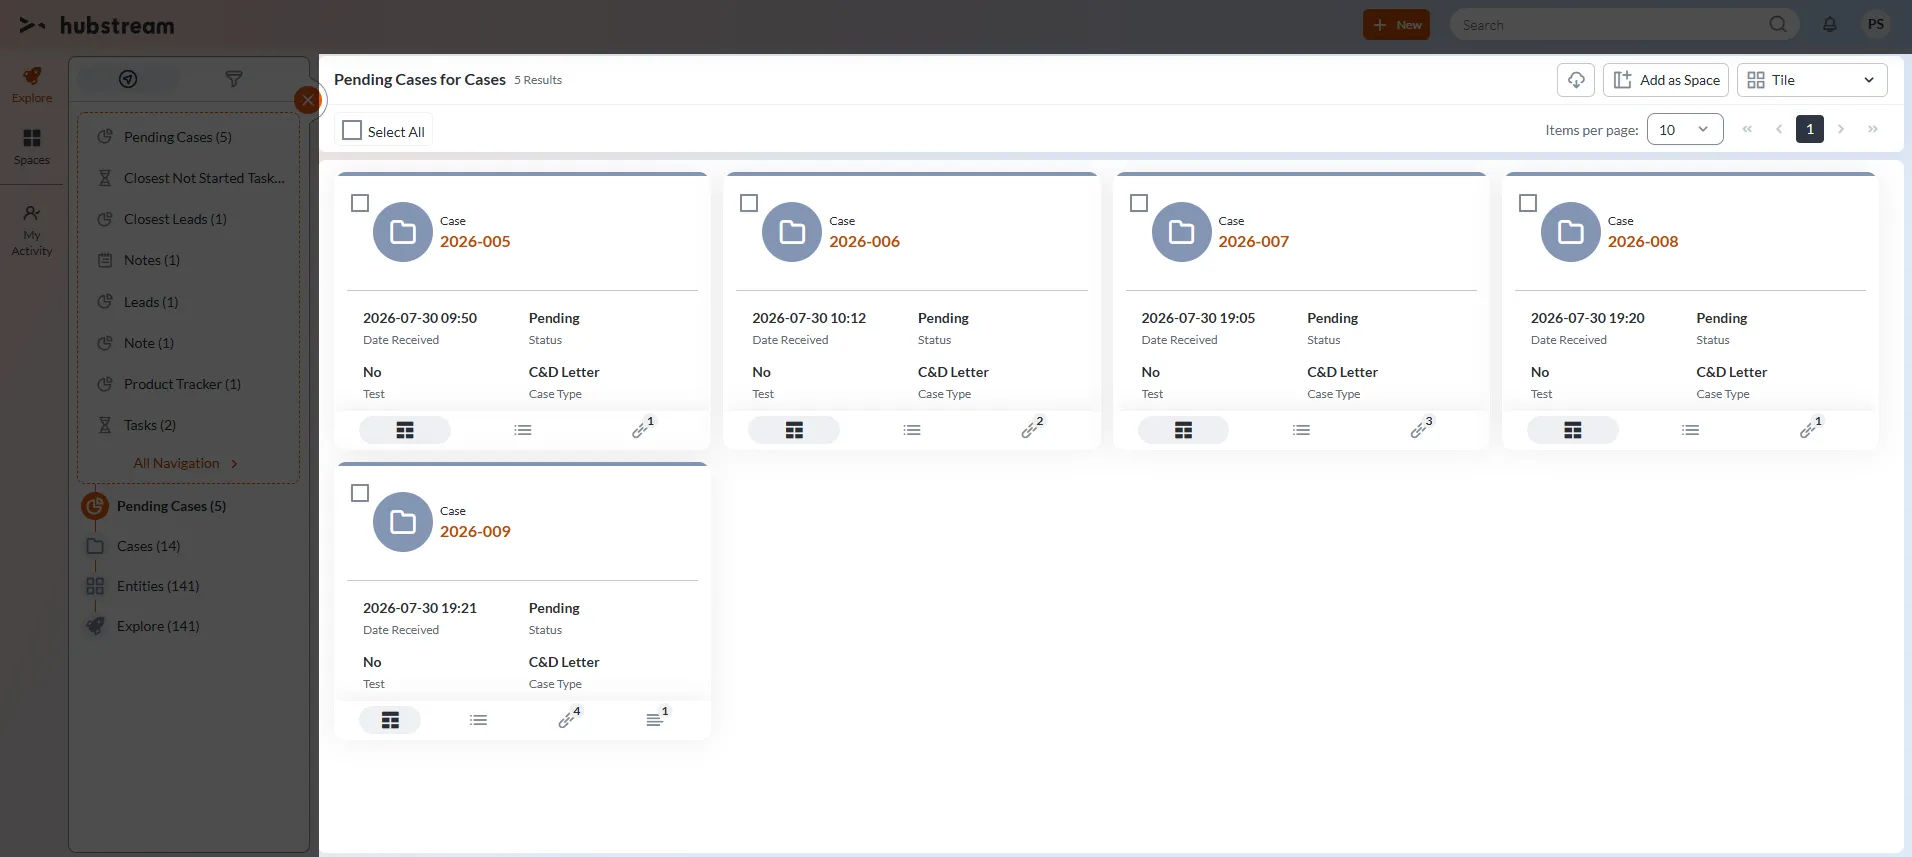
Overview
A Navigation Rule controls the visibility of child (directly linked) and grandchild entities (linked through a child entity) associated with a parent entity in the navigation pane or All Navigation page of a specific entity.
Using Navigation Rules, administrators can define which linked entities are displayed and the conditions under which they are displayed. The rule supports displaying information from Source, Closest, Moderate, and Closest to Moderate (both child and grandchild entities), enabling users to easily view all related entities and navigate between related entities without leaving the current context.
Navigation Types
Navigation rules are categorized into 2 types.
- Single
- Multiple
Note: The rule feature currently supports only the Single navigation type.
Create a Navigation Rule
As an Admin, you can create a Navigation Rule. Follow these steps:
- Navigate to the entity’s Rules page.
- Click the plus (+) icon in the header. The New Rule pop-up form will be displayed.
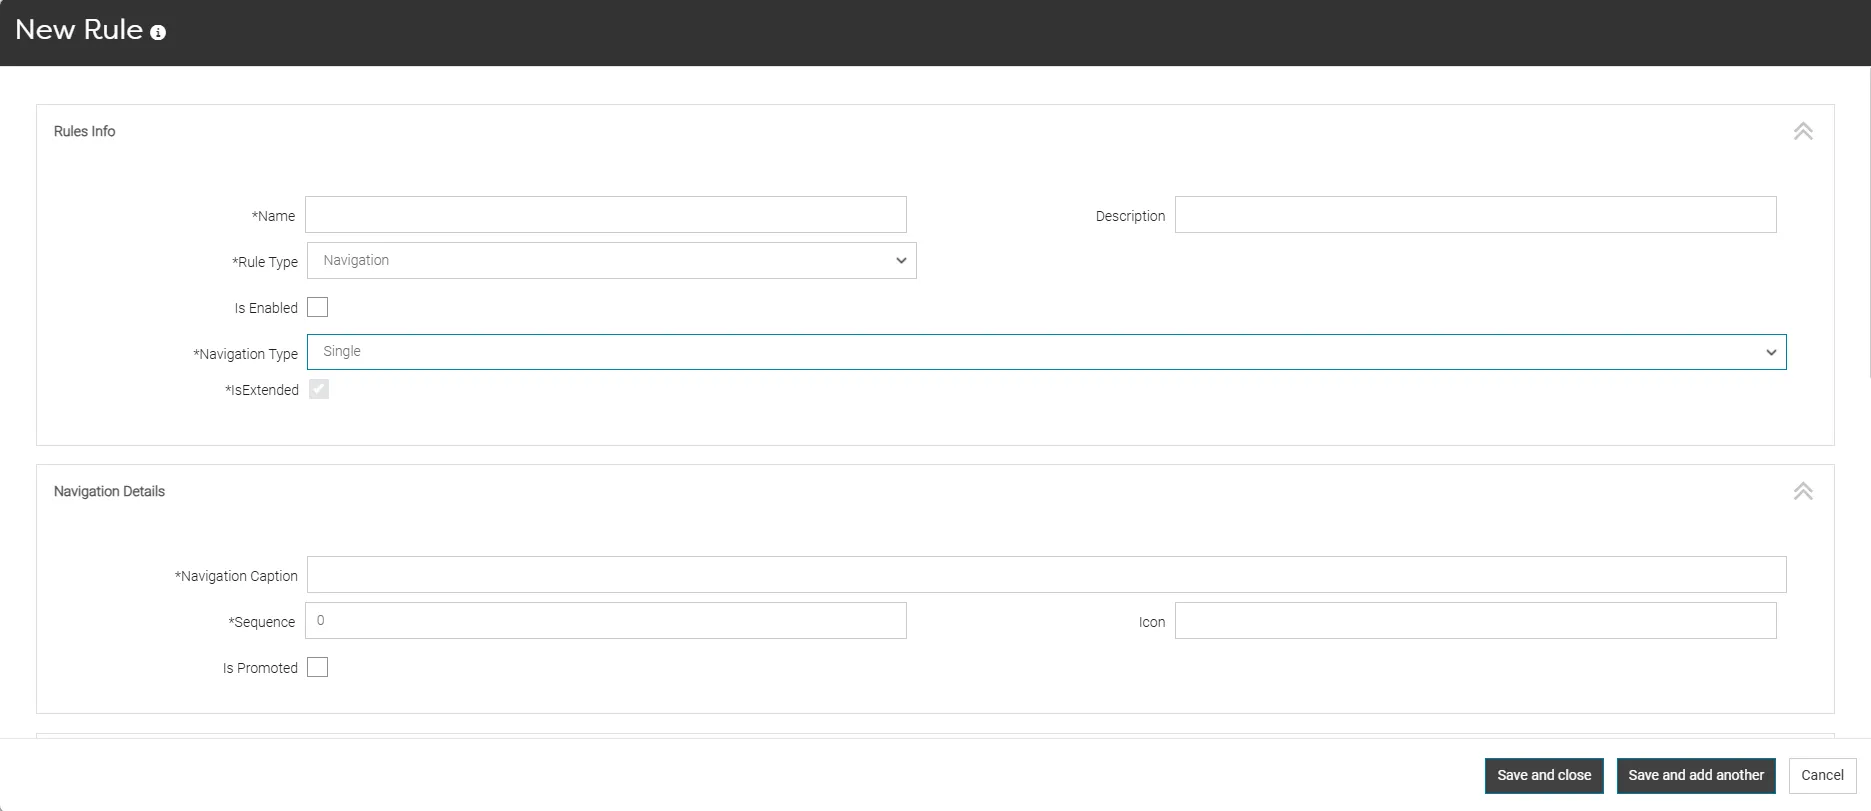
Rule Info
- Enter a rule name in the Name field.
- Select Navigation from the Rule Type dropdown list.
Note: The Is Enabled checkbox is selected by default when creating a new Navigation Rule. If the checkbox is cleared before saving, the rule is created in a disabled state and is not executed or displayed in the platform until it is enabled.
- Select the required Navigation Type.
Note: Currently, Single is the only navigation type supported in the rule feature.
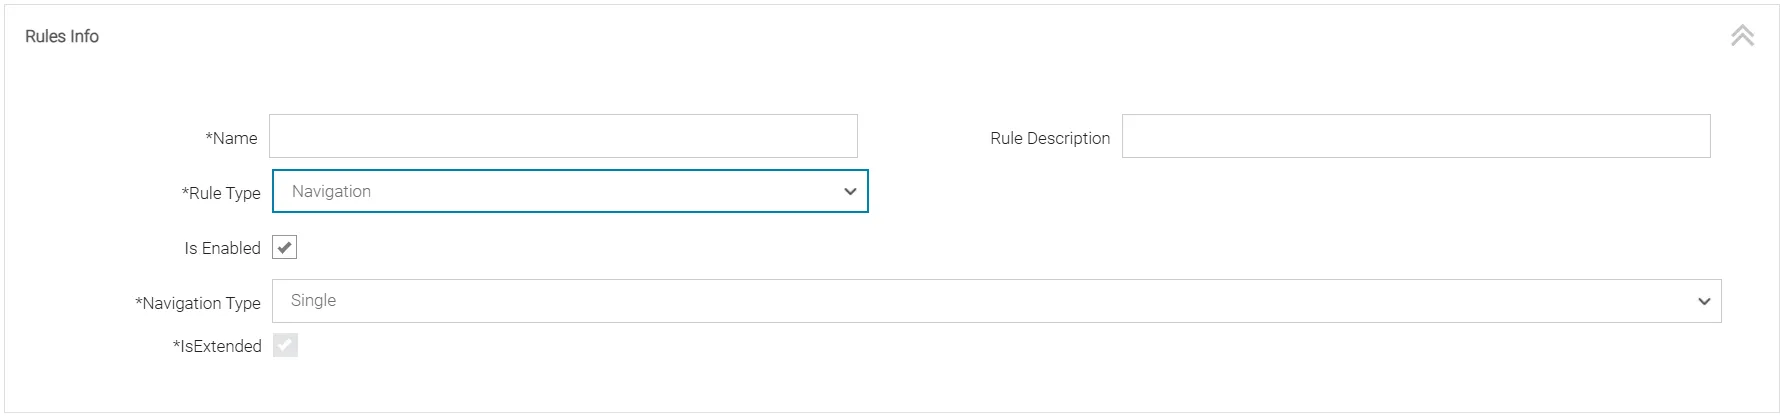
Query
The Query section determines the entity from which the text content is retrieved.
- Select the required Query Entity Type.
Note: When a rule is created from an entity type page (for example, Case or Lead), the system automatically sets the Query Entity Type to that entity.
- Select the required Link Level.
Note: The Link Level determines the source of the text content.
- Source displays information from the query entity.
- Closest displays entities directly linked (child entities) to the query entity.
- Closest to Moderate displays both directly linked (child entities) and their linked entities (grandchild entities to the source query entity).
- Moderate displays grandchild entities only.
- Select the Filter By Team checkbox, as required:
- When enabled, only linked entities belonging to the current user’s organization are displayed as navigations in the navigation pane.
- When disabled, linked entities from all organizations are displayed.
- Select the Assigned To Current User checkbox, as required:
- When enabled, only linked entities assigned to the current user are displayed as navigations in the navigation pane.
- When disabled, linked entities assigned to all users are displayed.
- Configure a query filter by selecting, as required:
- Field Filter
- Operator
- Value
- To add additional filters, select Add Another Filter. You can configure up to three query filters for a rule.
Navigation Details
- Enter a Navigation Caption.
Note: The Navigation Caption specifies the name displayed for the navigation item in the navigation pane and on the All Navigation page (for example, Closest Company, Pending Cases, or Open Tasks).
- Enter a Navigation Description.
Note: The Navigation Description is displayed as a tooltip when users hover over the navigation caption and is also displayed below the navigation caption on the All Navigation page.
- Enter the required Sequence value.
- Enter the required Icon.
Note: Only icons available in the Dataspace icon set are supported.
- Select Is Promoted, if the entity should also be displayed in the Navigation pane.
Note: When it is not selected, the entities are displayed only on the All Navigation page.

Visualization
- Select the required Layout Name.
Note: When a navigation is selected, entities are displayed using the selected visualization layout.
For example, if GridTableLayout is selected as the Layout Name:
- Entities are displayed in the Grid visualization when the navigation item is clicked.
- The All Navigations page displays a thumbnail preview of the selected layout. The layout name (Grid) is displayed as a tag below the navigation item.
If no Layout Name is selected:
- The thumbnail preview is not displayed.
- The layout tag is not displayed on the All Navigations page.
- When the navigation item is clicked, the entities are displayed in Grid visualization by default.

Sort Order
The Sort Order section determines the order in which entities are displayed when users open the navigation item.
- Select the required Sort Field.
- Select the required Sort Order.
- If additional sorting criteria are required, select Add Another Field.
For example, if a navigation item displays Closest Companies (7):
- Without a sort configuration, the companies may be displayed in the default system order.
- If Company Name is selected as the Sort Field and Ascending is selected as the Sort Order, companies are displayed alphabetically from A to Z.

Conditions
- Select the required condition.
- Select the required Operator.
- Enter the required Value.
- Select Add Another Condition, to add another condition.
- Repeat the process for each additional condition.
Note: When a rule is created from an entity page (for example, Case or Lead), the system automatically sets the system-defined entity name in the Condition 1 field.
Save the Rule
- Review the configuration.
- Click Save.
After the rule is saved, entities that match the configured Query, Navigation Details, Sort Order, and Conditions are displayed as a navigation item in the Navigation Pane and All Navigation page. If one or more conditions are not satisfied, the navigation item is not displayed in the navigation pane or All Navigations page.
Examples
The following examples demonstrate how to create a Custom Navigation Rule and display related entities as navigation items in the navigation pane of a specific entity.
Scenario 1:
As an admin, you want to display Lead (Closest) entities directly linked to a Case entity in the navigation pane. Only Leads that are not in a “Closed” status should be displayed.
Configuration
Section 1: Rule Info
- Navigate to the Rules page of the Lead entity.
- Click the plus (+) icon.
- Enter a rule name in the Name field. (Eg. Closest Leads)
- Select Navigation from the Rule Type dropdown list.
- Select Single as the required Navigation Type.
Section 2: Query
- In the Query Entity Type field, the Lead entity was selected by default.
- In the Link Level field, select Closest.
- Configure the following query filter:
- Field Filter 1 = Status
- Operator = Not In
- Value 1 = Closed
- Configure Filter By Team and Assigned to Current User as required. If these filters are not needed, leave them unchecked.
Section 3: Navigation Details
- Enter Closest Leads in the Navigation Caption field.
- Enter a description in the Navigation Description field.
- Example: This shows all Leads linked to the Case, excluding the closed leads.
- Enter Lead in the Icon field.
- Enter 1 in the Sequence field.
- Select Is Promoted.
Section 4: Visualization
- Select GridTableLayout in the Layout Name field.
Section 5: Sort Order
- Select Name in the Sort Field 1 field.
- Select Ascending in the Sort Order field.
- Select Add Another Field.
- Select Queue in the Sort Field 2 field.
- Select Ascending in the Sort Order field.
Section 6: Conditions
Configure the following conditions:
Condition 1 (Selected by default)
- Condition 1 = Query Entity Name
- Operator = Equals
- Value = Lead
Condition 2
- Condition 2 = Parent Entity Name
- Operator = Equals
- Value = Investigation
Note: Investigation is the system-defined name for the Case entity.
Condition 3
- Condition 3 = Query Result Count
- Operator = Not Equals
- Value = 0
Save the Rule
- Review the configurations.
- Click Save to save the rule.
Expected outcomes:
When the rule conditions are satisfied:
- A Closest Leads navigation item is displayed in the Case entity’s navigation pane.
- The navigation item is displayed with the number of linked Lead entities.
- Only Lead entities whose status is not Closed are included in the navigation results.
- The navigation item displays the configured Lead icon.
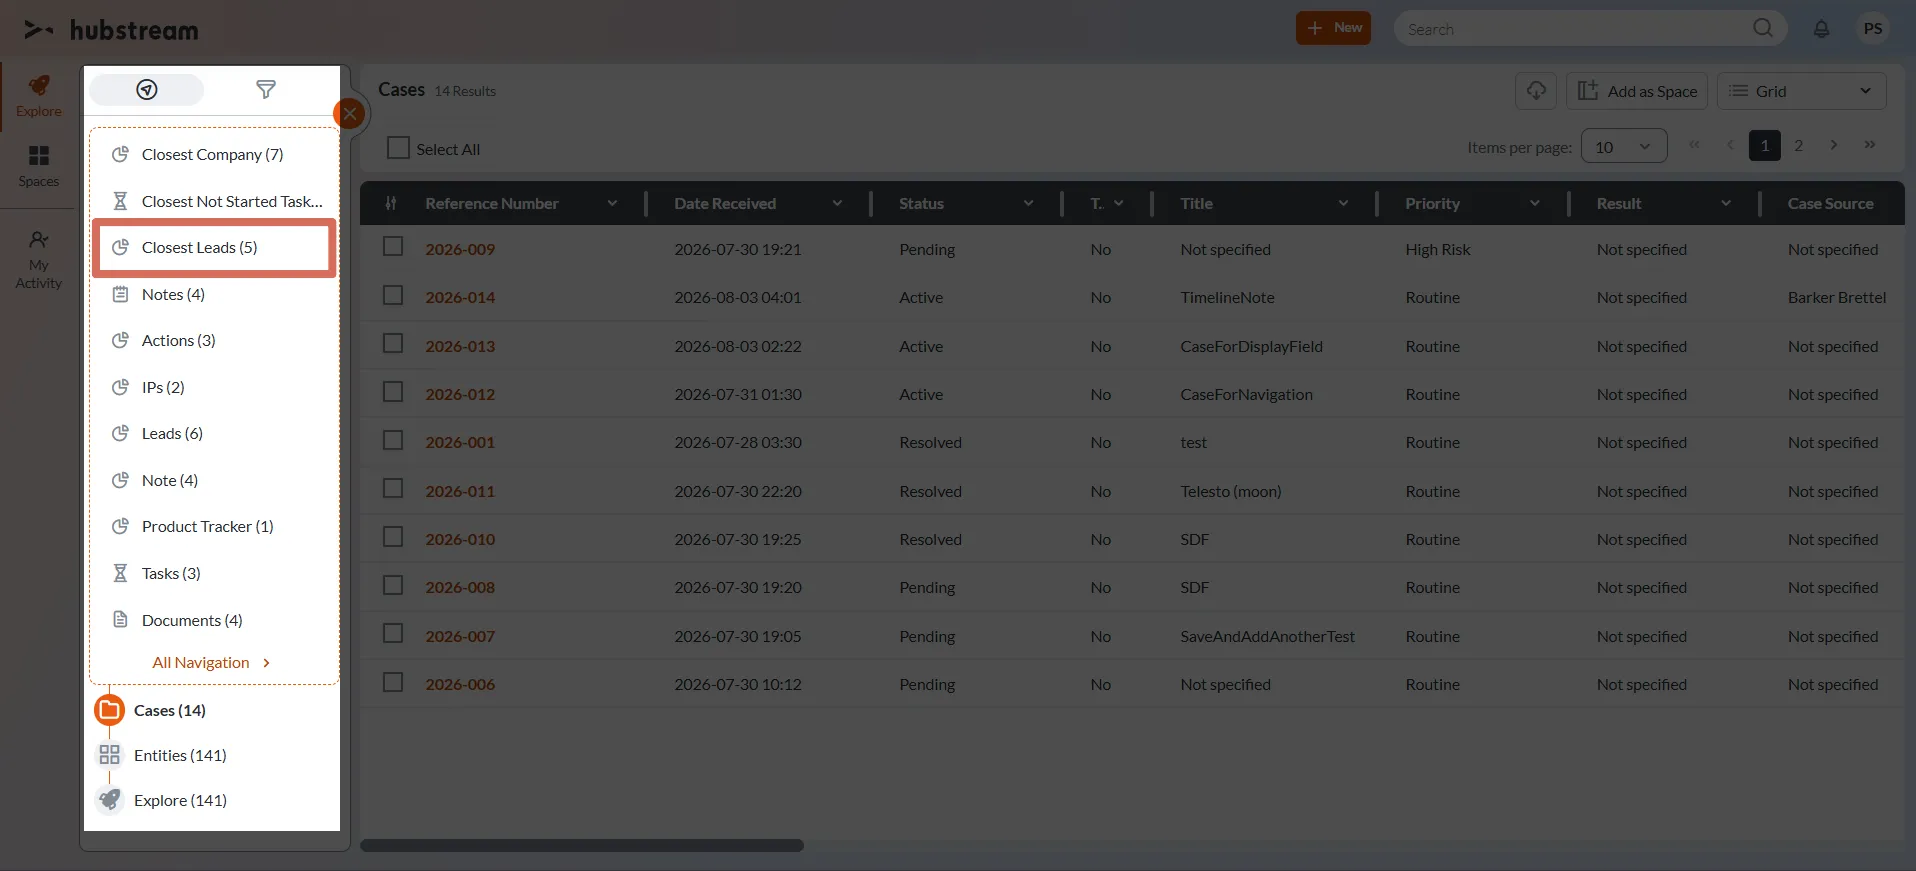
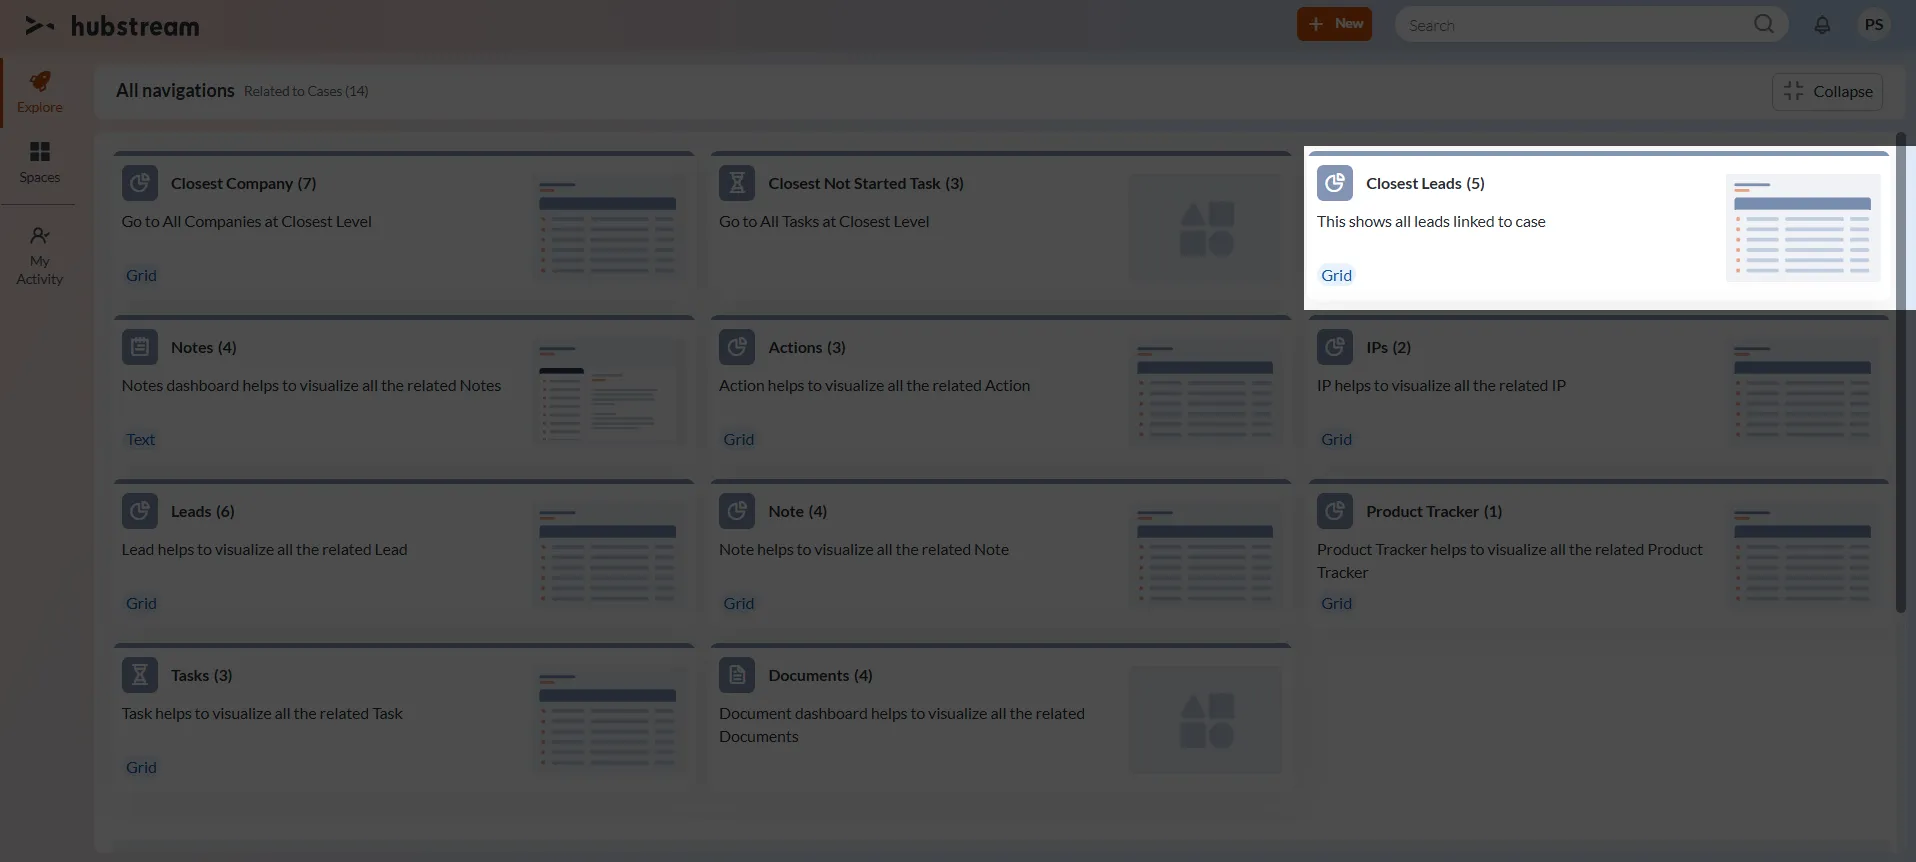
- The navigation item is displayed in both the navigation pane and the All Navigations page because Is Promoted is enabled.
- A layout thumbnail and the Grid tag are displayed on the All Navigations page.
- On the All Navigations page, the Closest Leads navigation displays the description provided in the Navigation Description field.
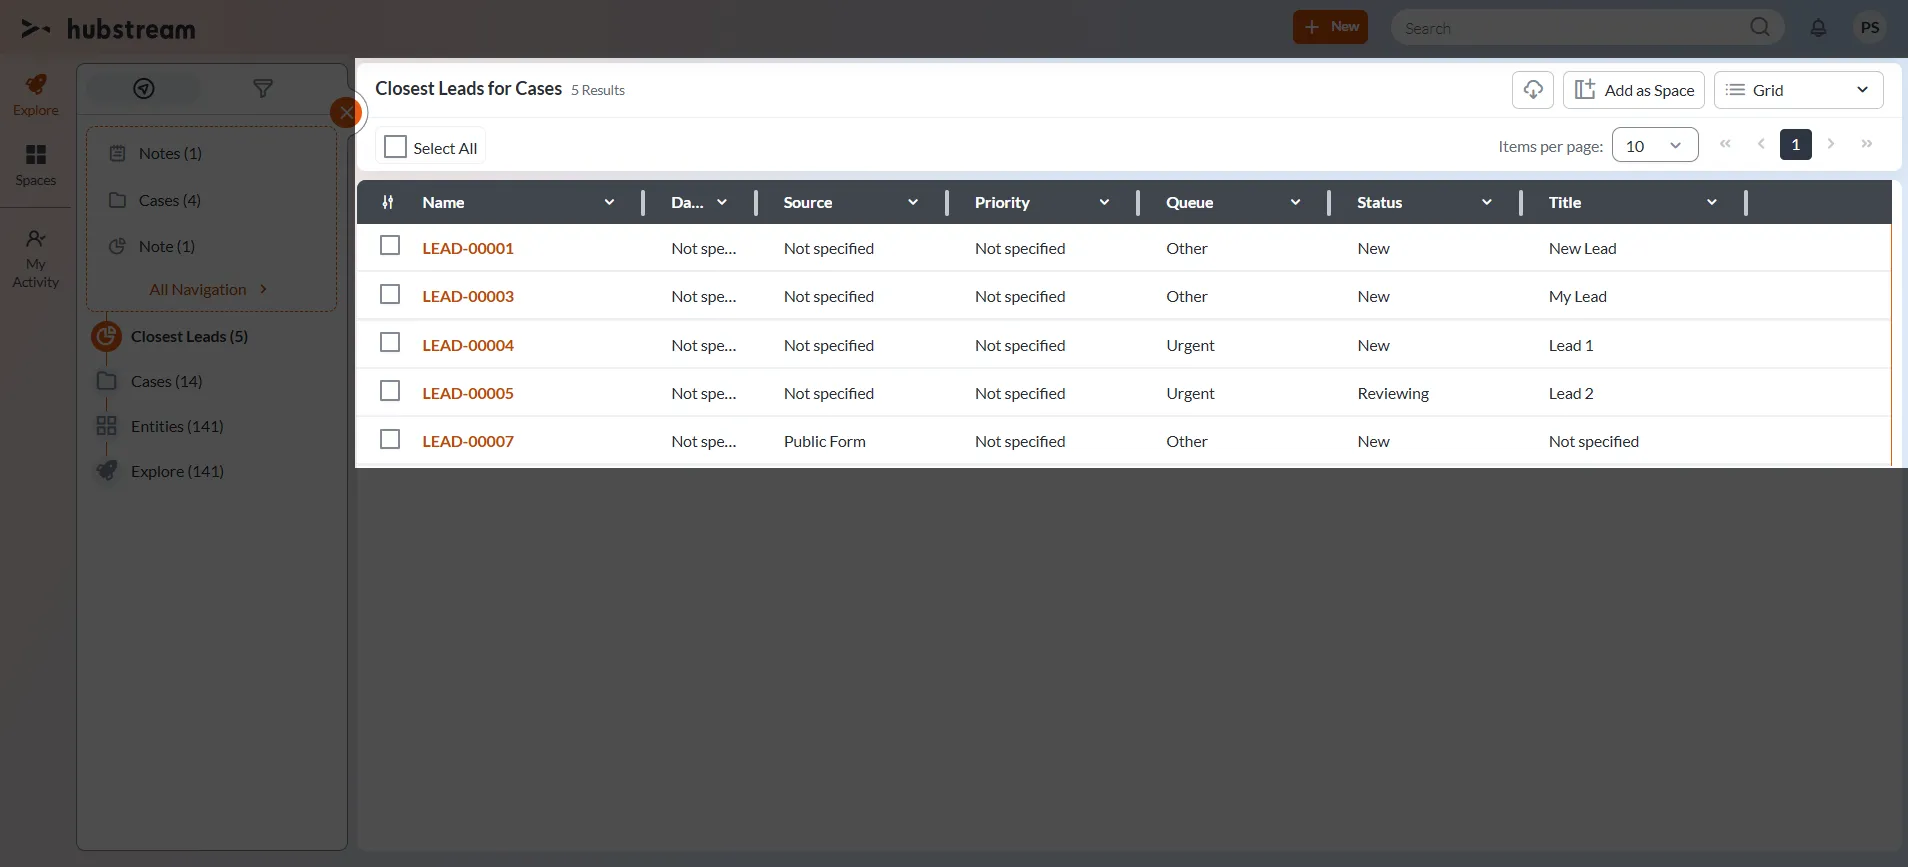
- When users navigate to the Closest Leads, the entities are displayed using the Grid visualization configured in the Navigation Rule.
- Lead entities are sorted alphabetically by Name and then by Queue in ascending order.
Scenario 2:
As an admin, you want to display Pending Cases (Source) in the navigation pane. Follow the below steps:
Configuration
Section 1: Rule Info
- Navigate to the Rules page of the Case entity.
- Click the plus (+) icon.
- Enter a rule name in the Name field. (Eg. Pending Cases)
- Select Navigation from the Rule Type dropdown list.
- Select the required Navigation Type (Single).
Section 2: Query
- In the Query Entity Type field, the Case entity was selected by default.
- In the Link Level field, select Source.
- Configure the following query filter:
- Field Filter 1 = Status
- Operator = Equals
- Value 1 = Pending
- Configure Filter By Team and Assigned to Current User as required. If these filters are not needed, leave them unchecked.
Section 3: Navigation Details
- Enter Pending Cases in the Navigation Caption field.
- Enter a description in the Navigation Description field.
- Example: Displays all Pending Cases available at the source level.
- Enter Case in the Icon field.
- Enter 1 in the Sequence field.
- Select Is Promoted.
Section 4: Visualization
- Select TileLayout in the Layout Name field.
Section 5: Sort Order
- Select the Case Type field in the Sort Field 1 field.
- Select Ascending in the Sort Order field.
- Select Add Another Field.
- Select the Date Received field in the Sort Field 2 field.
- Select Ascending in the Sort Order field.
Section 6: Conditions
Configure the following conditions:
Condition 1 (Selected by default)
- Condition 1 = Query Entity Name
- Operator = Equals
- Value = Investigation
Note: Investigation is the system-defined name of the Case entity.
Condition 2
- Condition 2 = Query Result Count
- Operator = Not Equals
- Value = 0
Save the Rule
- Review the configurations.
- Click Save to save the rule.
Expected outcomes:
When the rule conditions are satisfied:
- A Pending Cases navigation item is displayed in the Case entity’s navigation pane.
- The navigation item displays the total number of Pending Case entities.
- Only Cases with a Pending status are included in the navigation results.
- The navigation item displays the configured Case icon.
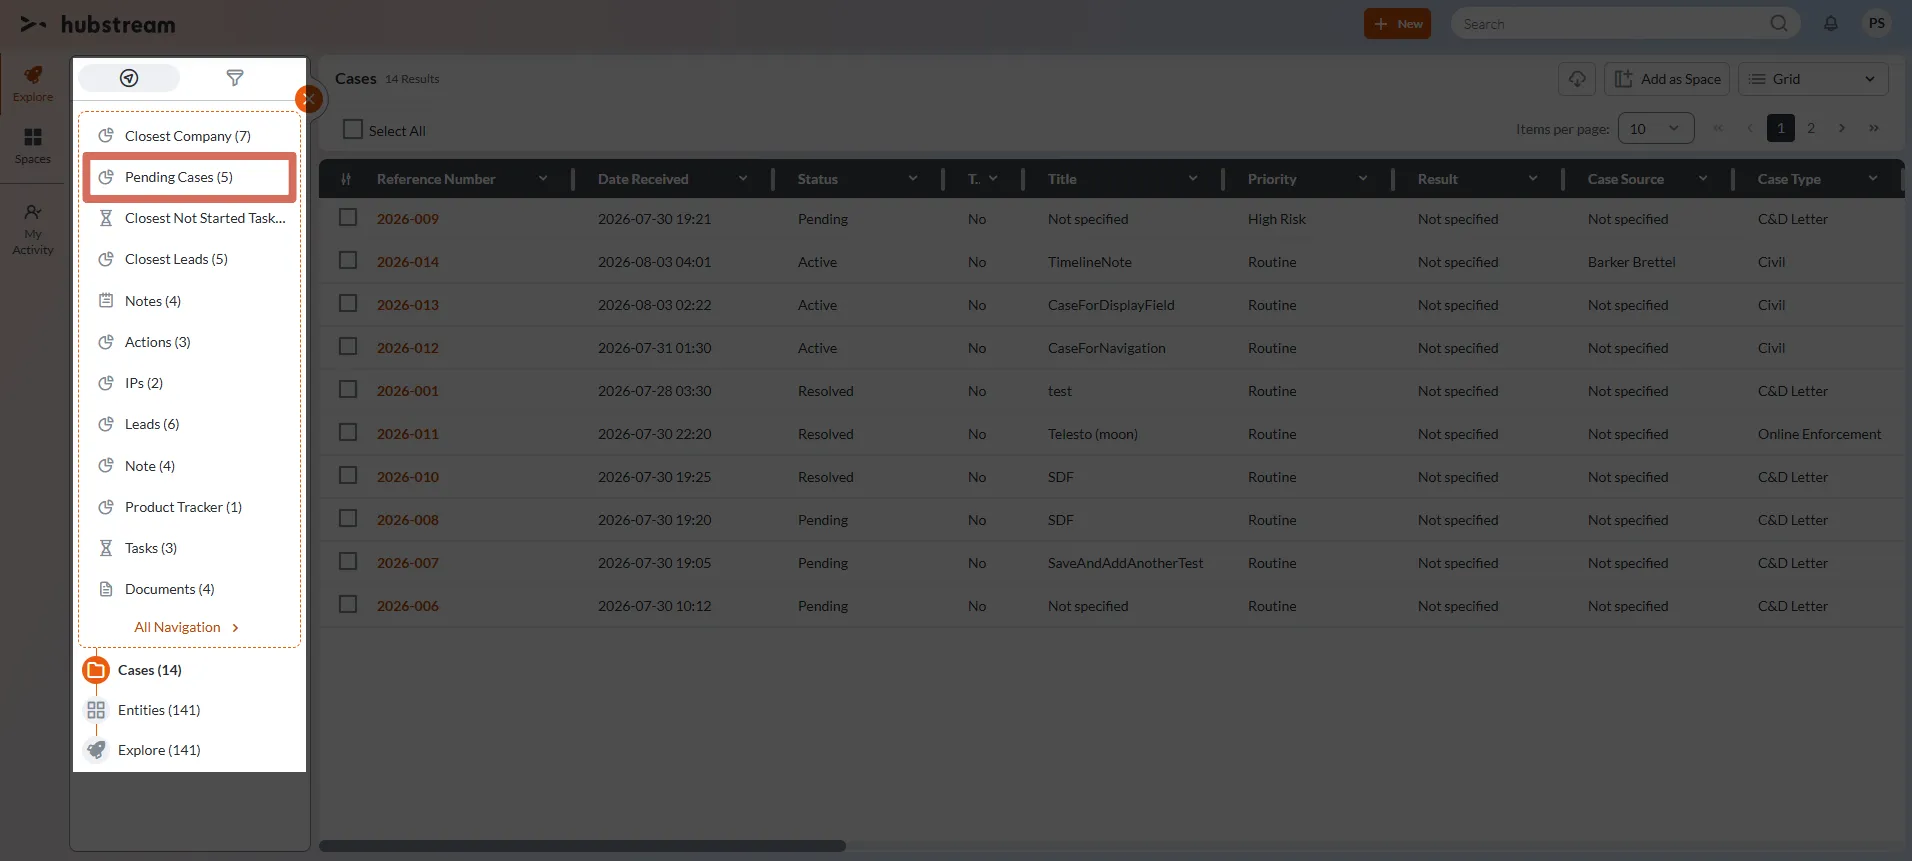
- The navigation item is displayed in both the navigation pane and the All Navigations page because Is Promoted is enabled.
- The navigation page displays the configured navigation description (Go to all Pending Cases).
- A Tile layout thumbnail and Tile tag are displayed for the Pending Cases navigation item on the All Navigations page.
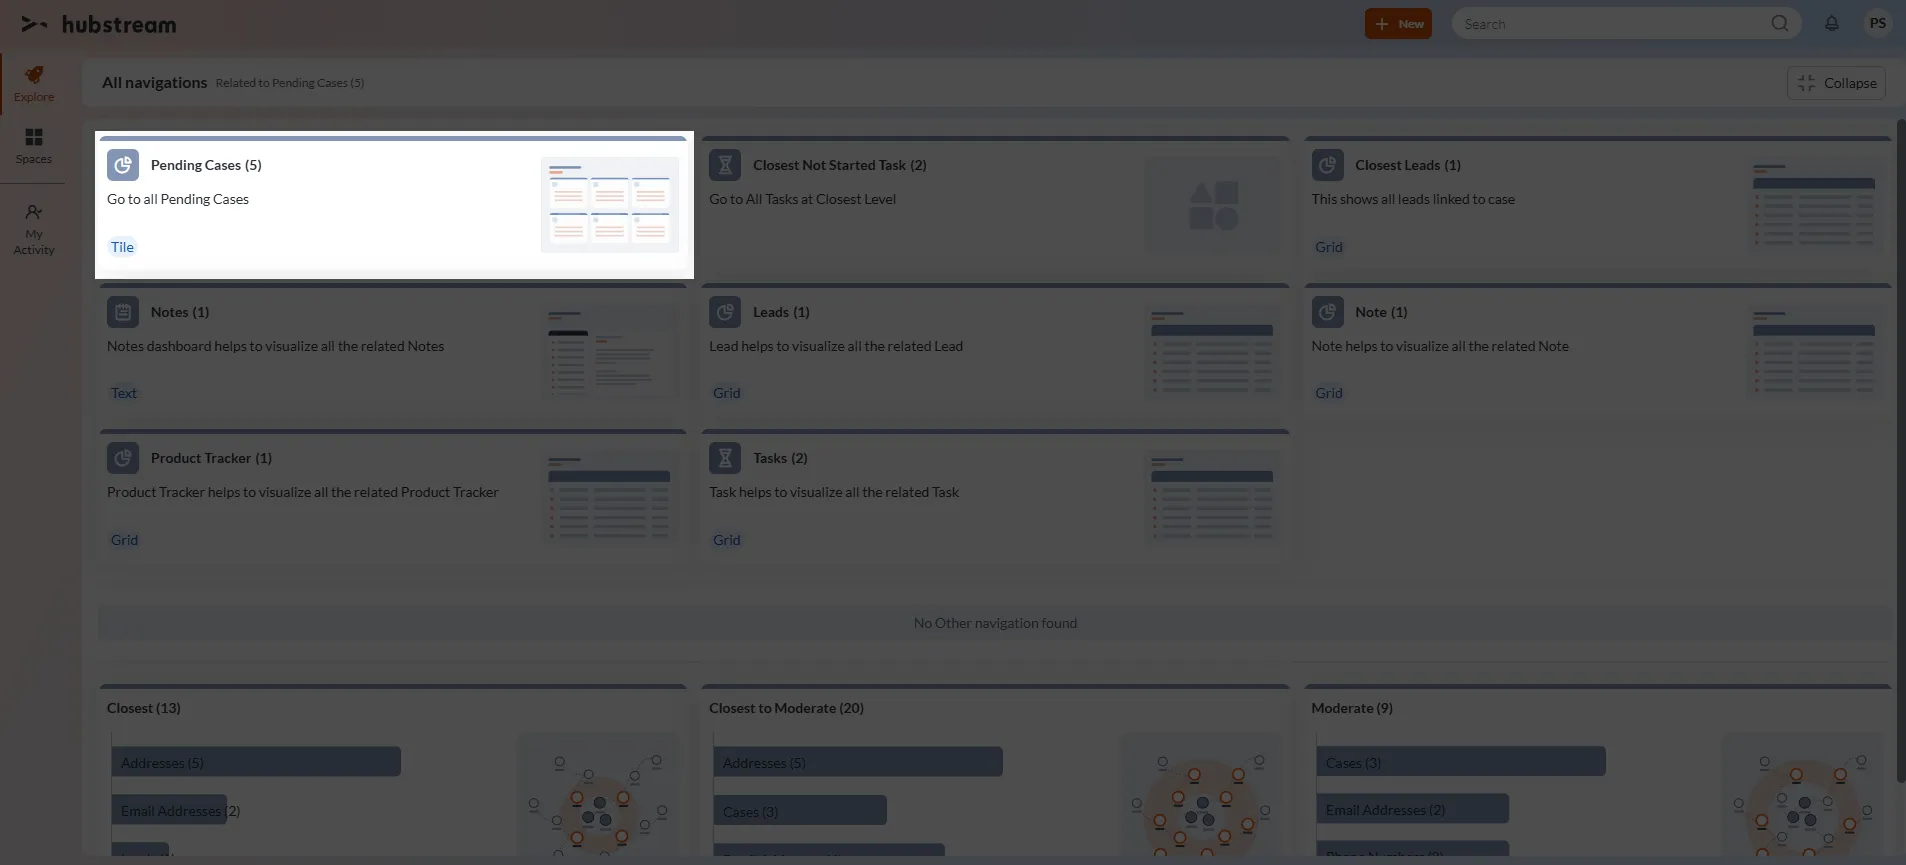
- When users navigate to the Pending Cases, the entities are displayed using the Tile visualization configured in the Navigation Rule.
- Case entities are sorted by Case Type and then by Date Received in ascending order.