Overview
A Tile Rule controls the display of tiles within the user interface. Tiles are used to present entity information in a structured format, enabling users to quickly view key information directly.
Tile Rules can be used to display information from the current entity or from linked entities. The information displayed in a tile is determined by the query, tile configuration, and conditions defined in the rule.
Tile Types
Tiles are categorized into three types.
- Entity Tile – Displays information from a linked entity when the configured rule conditions are satisfied.
- Summary Tile – Displays a summarized view of linked entities, including entity counts, linked entity information, chart-based visualizations, and quick access to entity details when the configured rule conditions are satisfied.
- Text Tile – Displays long-text content from the current entity or linked entities and provides a preview with a Read More option when the configured rule conditions are satisfied.
Entity Tile
An Entity Tile displays information from an entity within the Entity Explorer. Depending on the configuration, the tile can display information from the current entity or from a linked entity. Entity Tiles are also used when entities are displayed in a tile view.
Entity Tiles allow admins to display:
- Overview of entity
- Entity fields
- Linked entities
- Long-text content such as summaries and notes
The information displayed in the tile is controlled through the rule configuration.
Creating an Entity Tile Rule
As an Admin you can create a new Tile rule as required. Follow the steps below to add a Tile rule:
- Navigate to the entity’s Rules list page.
- Click the plus (+) icon in the header. The New Rule pop-up form will be displayed.
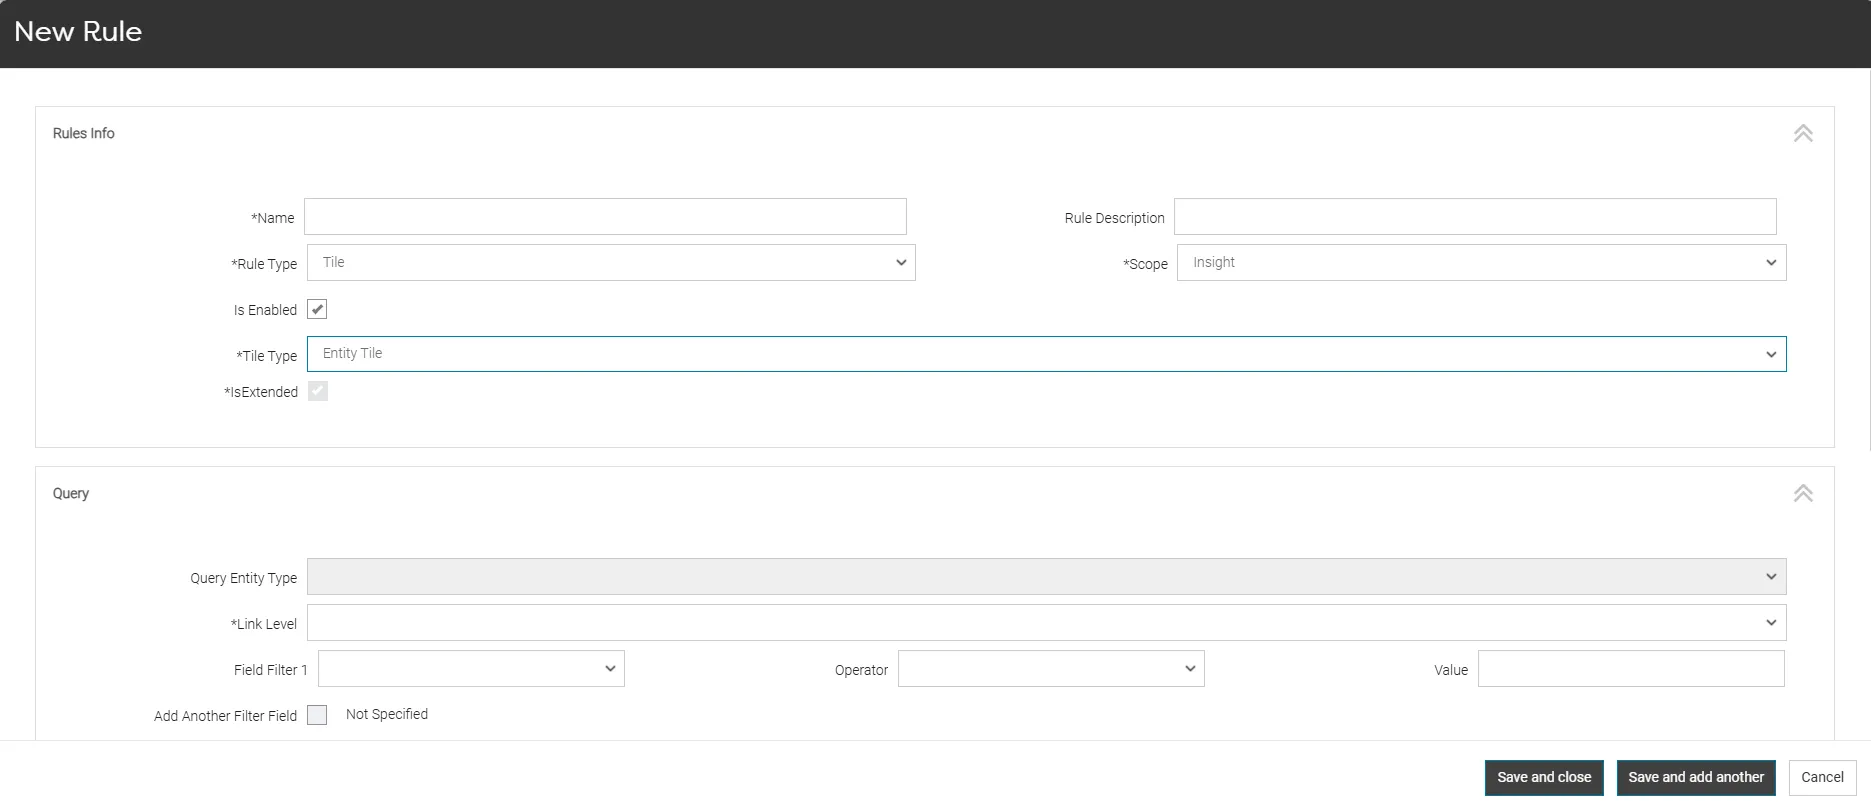
Rule Info
- Enter a rule name in the Name field.
- Select Tile from the Rule Type dropdown list.
- Select the required Tile Type (Entity Tile).
- Select the required Scope (Insight or Tile View).
Note: Currently, the platform supports the Insight and Tile View scope types. These options are available for selection in the rule form.
Query
The Query section defines the entity from which the tile retrieves information.
- Select the Query Entity Type.
Note: When a rule is created from an entity page (for example, Case or Lead), the system automatically sets the Query Entity Type to that entity.
- Select the required Link Level.
Note: The Link Level field is mandatory.
- Closest - Displays information from linked entities.
- Source - Displays information from the current (parent) entity.
For Entity Tiles, Closest is typically preferred because it displays linked entity information rather than information already available for the current entity.
- If required, configure the query filter by selecting:
- Field Filter (field available for that entity, such as Title, Status, or Priority)
- Operator (defines how the field value is evaluated against the specified value)
- Value (field values)
Query filters control which entities of the selected query entity type are displayed in the tile.
Example: If the filter is configured as Status = Active for a Case as Query entity type, only entries with an Active status are displayed as tile. If the entity status changes to Pending, Hold, or Completed, the tile is not displayed because it no longer matches the configured filter criteria.
- To add additional query filters, select Add Another Filter. You can configure up to three query filters for a rule.

Tile Configuration
The Tile Configuration section determines the information that is displayed within the tile.
- Show Field Tab - select Yes to display entity fields in the tile. Select No if fields are not required.
- Show Text Tab - select Yes to display text contents in the tile. Select No if text contents is not required.
- Show Links Tab - select Yes to display links in the tile. Select No if links are not required.
Note: An additional Show Preview Tab field is available for certain entity types. For example, this field is displayed when the selected entity is Document.

Note: When Yes is selected for a configuration option, the corresponding configuration section becomes available in the form.
- Show Field Tab = Yes instructs the system to display the entity fields configured for tile display through the entity Field’s Visibility Properties settings.
Note: Fields displayed in the Entity Tile are not configured from the Tile Rule form.
To configure field visibility in a tile:
- Navigate to the Entity Types.
- Search the required entity.
- Click the Fields hyperlink.
- Select the required field. An action menu appears on the right side.
- Click Edit. An Edit Dropdown field popup appears on the screen.
- Select Advanced Options.
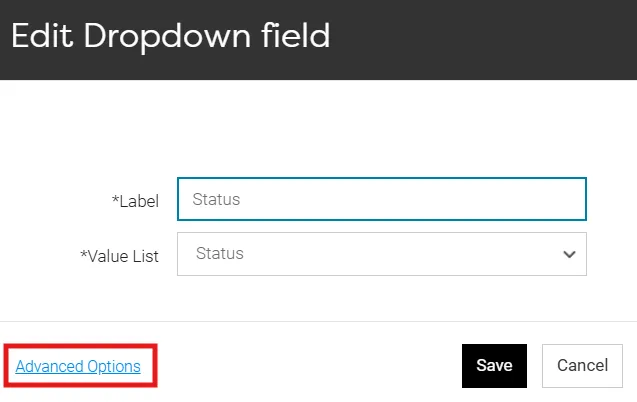
- Select Visibility Properties.
- In the Show on Tile field, select Yes, Auto, or No.
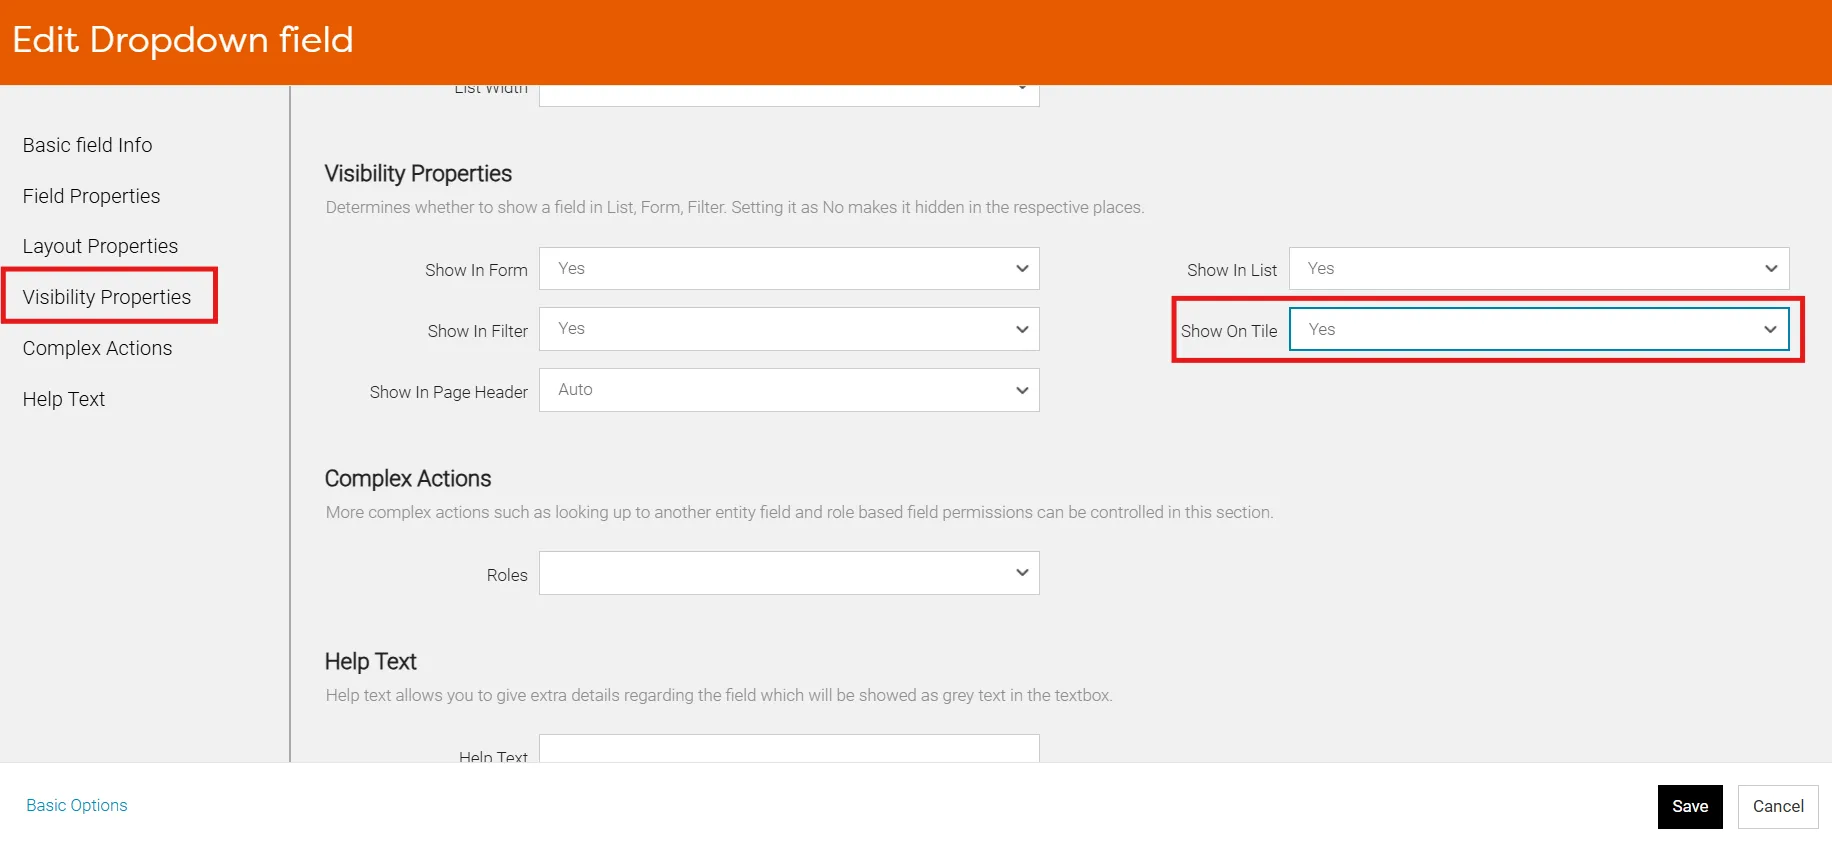
The selected option determines whether the field is displayed in the Entity Tile.
- Show Text Tab = Yes displays the Text Tab configuration section, allowing administrators to configure text content for the tile.
- Show Links Tab = Yes displays the Links Tab configuration section, allowing administrators to configure links for the tile.
- Show Preview Tab = Yes displays the Preview Tab configuration section, allowing admins to configure document previews for the tile.
Note: The Show Preview Tab option is available only when the selected query entity is Document. When enabled, admin can configure the preview tab using the Preview Style field. Supported preview types include:
- Thumbnail – Displays a thumbnail preview of the document.
- File Type Icon – Displays an icon representing the document type.
The corresponding section is hidden when No is selected.
Depending on the selected options, configure the available tabs.
Links Tab Configuration
The Links Tab Configuration section is used to define the linked entities that are displayed within the tile.

- Select a Linked Entity Template to include the entities defined in the template.
- If additional linked entities are required, select the required entity in the Linked Entity Type field.
- If certain entities should not be displayed, select them in the Excluded Linked Entity field.
Example: In this example, we demonstrate how to use the Links Tab Configuration to display linked entities in an Entity Tile.
Scenario 1: An admin wants to display linked business process entities such as Case, Lead, and IP through a predefined entity template.
Step:
- Select the required Linked Entity Template containing the business process entities.

Expected outcome:
When the Entity Tile is displayed, the links to the configured entities (Case, Lead, and IP) are displayed in the Links Tab.
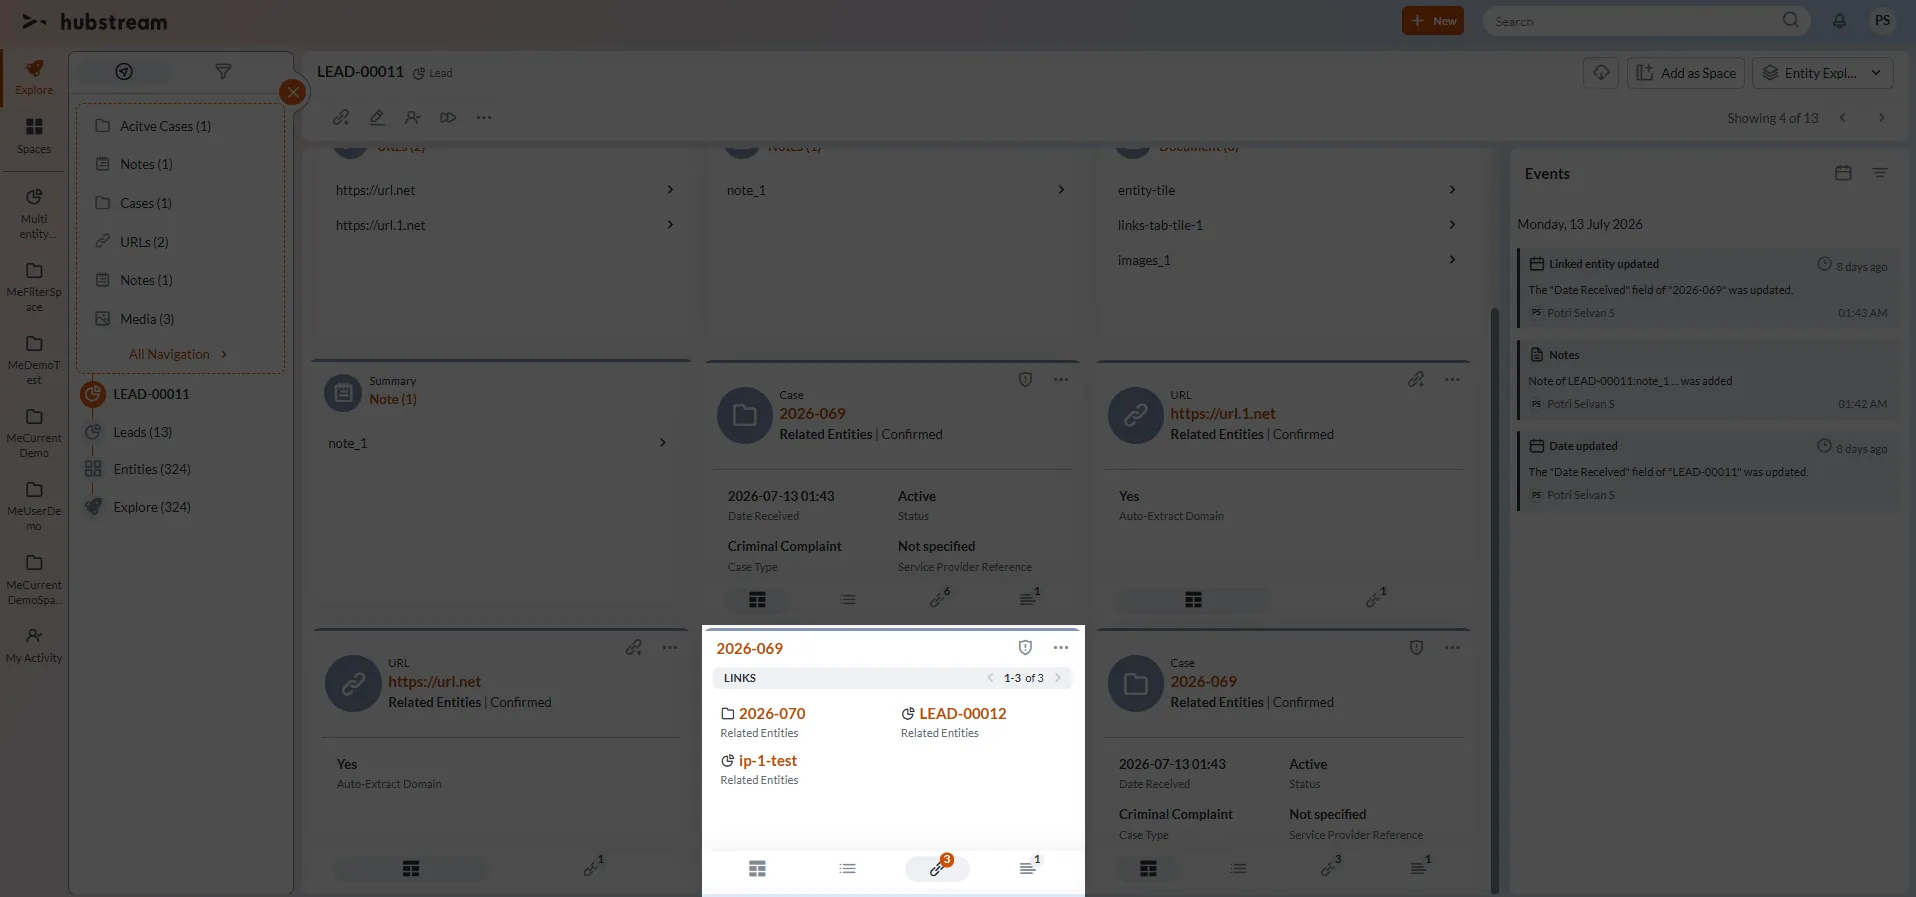
Scenario 2: An admin wants to display the entities available in a selected entity template and additionally display the Address entity in the Entity Tile.
Steps:
- Select the required Linked Entity Template.
- In the Linked Entity Type field, select Address.

Expected outcome:
When the Entity Tile is displayed, the entities from the selected template and the Address entity are displayed in the Links Tab.
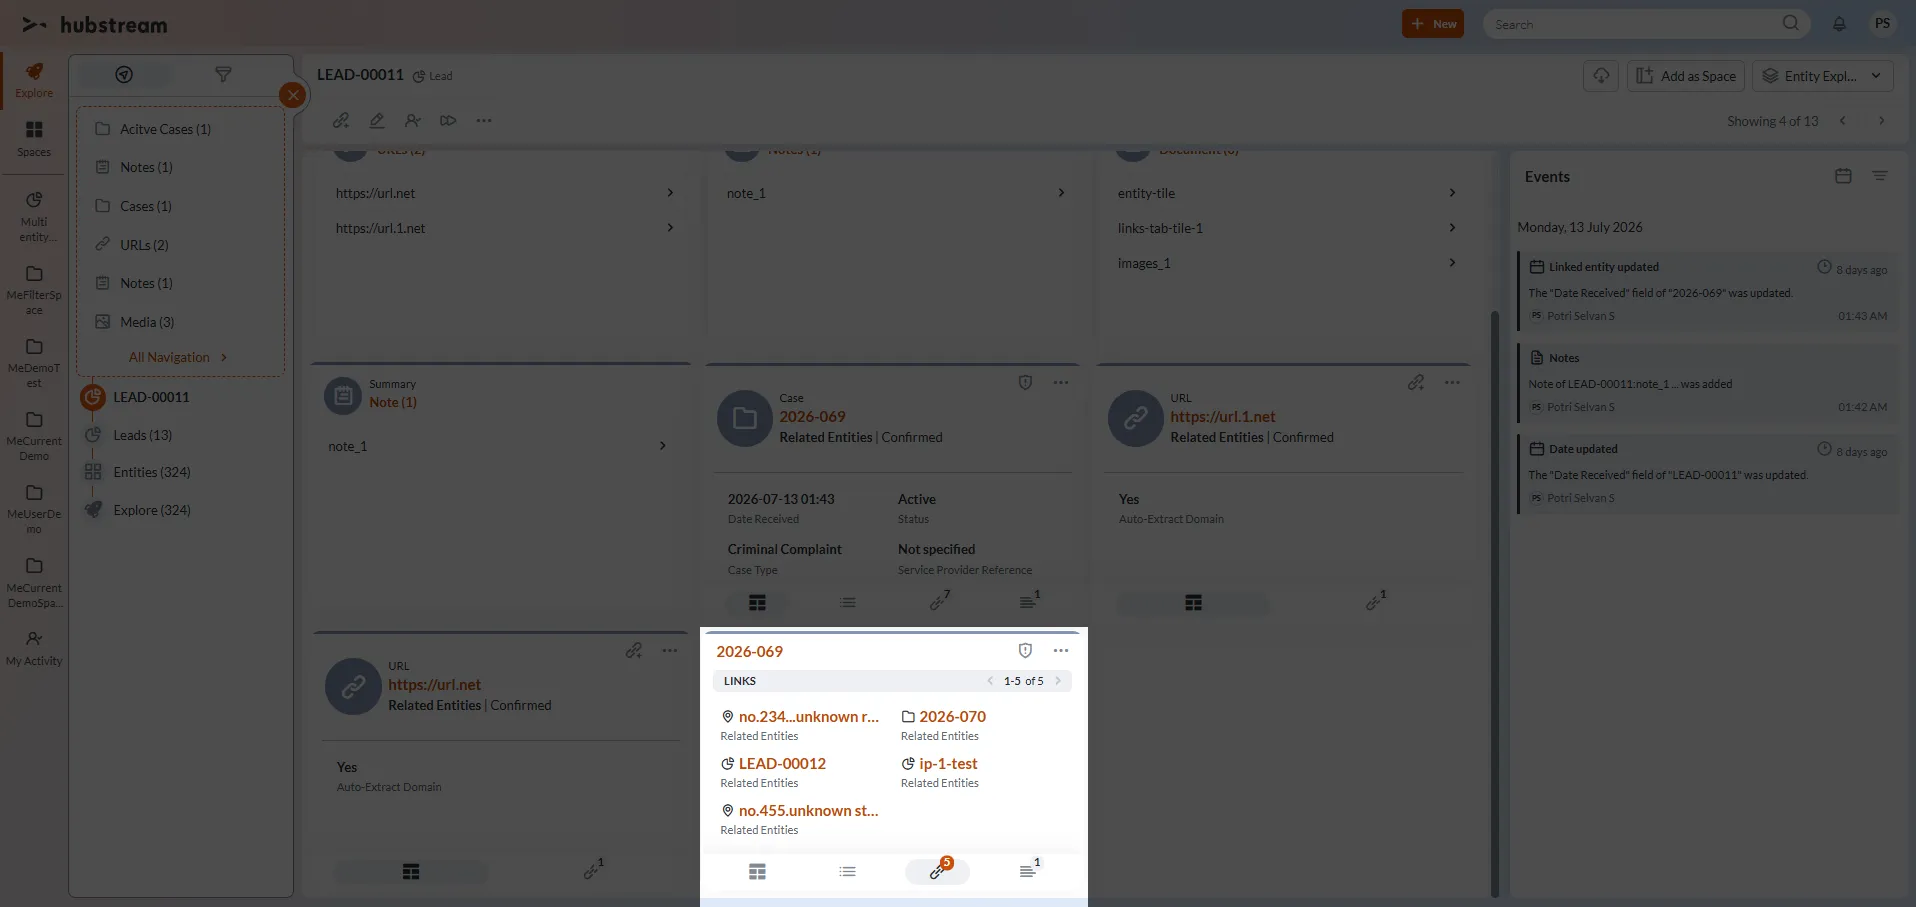
Scenario 3: An admin wants to display entities from a template containing Case, Lead, and Takedown entities, but does not want the Takedown entity to be displayed in the Entity Tile.
Steps:
- Select the required Linked Entity Template containing Case, Lead, and Takedown entities.
- In the Excluded Linked Entity field, select Takedown.

Expected outcome:
When the Entity Tile is displayed, the Case and Lead entities are displayed in the Links Tab, while the Takedown entity is excluded from the tile.
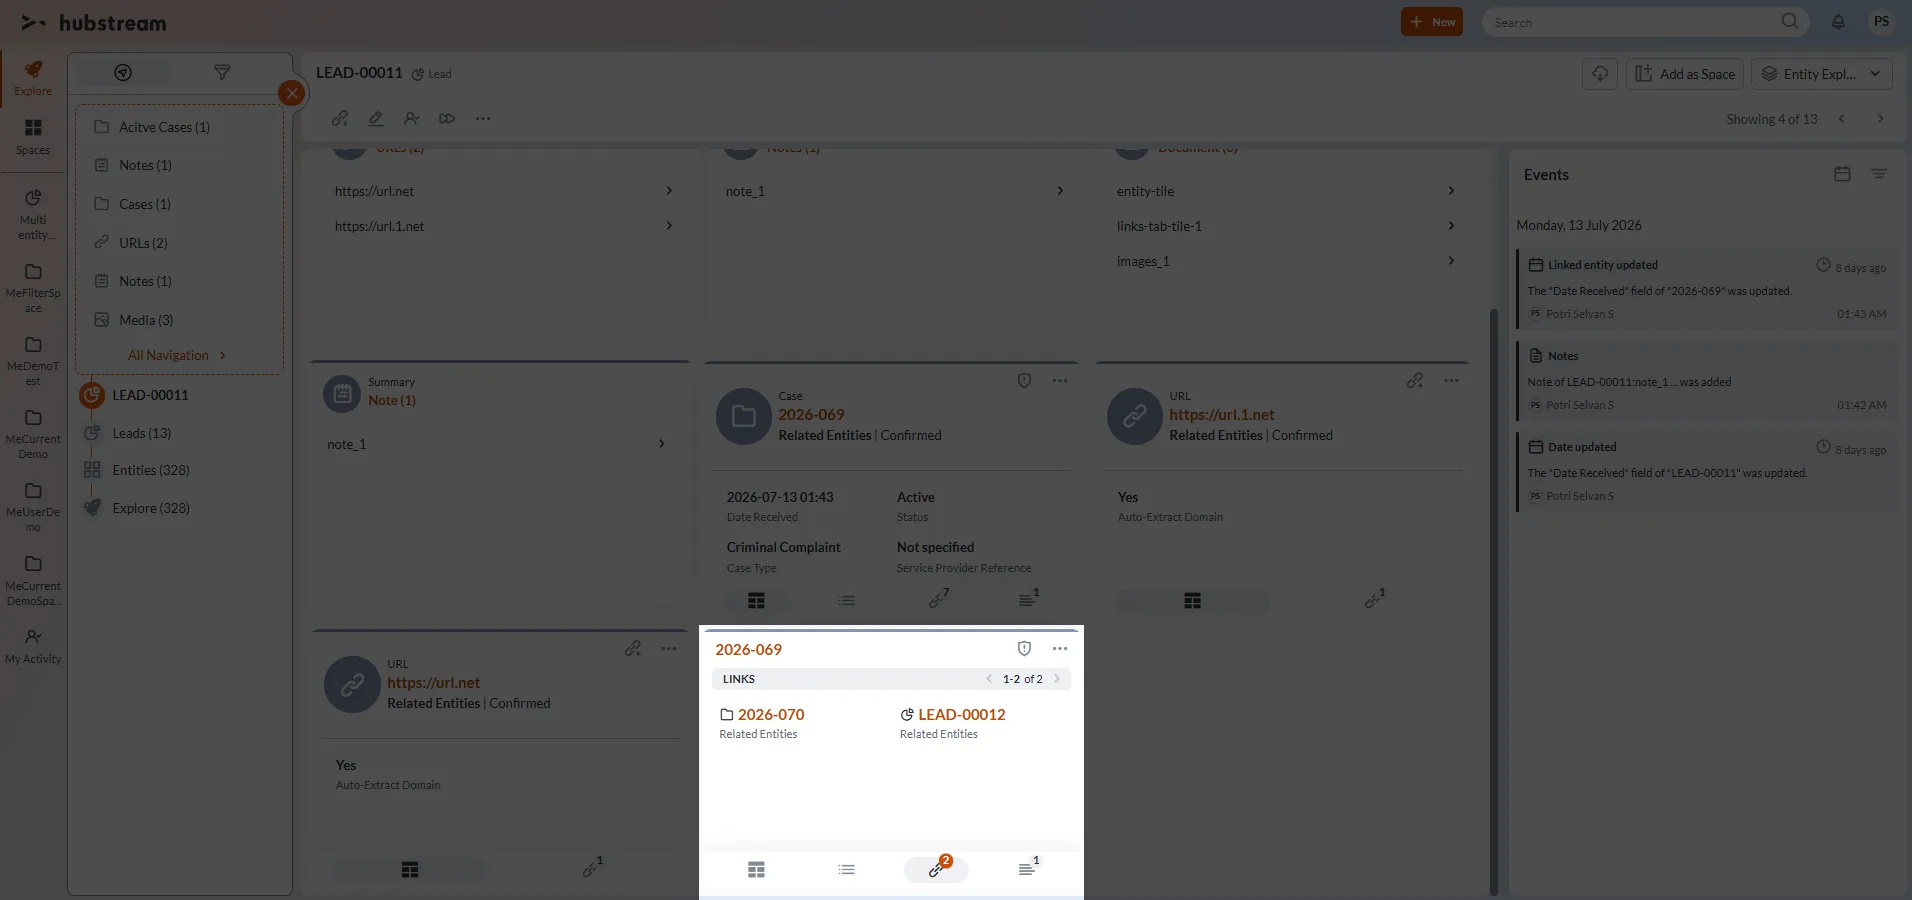
Note: The Excluded Linked Entity field can be used to remove specific entities provided through a selected entity template without modifying the template itself.
Text Tab Configuration
The Text Tab is used to display long text content within an Entity Tile. This is useful for displaying information such as summaries, descriptions, notes, or other text-based content associated with an entity.
The fields displayed in the Text Tab configuration depend on the selected Link Level.

- Select Yes in the Show Text Tab field.
- Select the required Link Level.
Note: The Link Level determines the source of the text content.
- Source displays long-text content from the current (query) entity.
- Closest displays long-text content from a query entity’s linked entity.
- If Source is selected:
- Select the required Field Name.
- If Closest is selected:
- Select the required Linked Entity Type.
- Select the required Field Name.
- Select the required Sort By field.
- Select the required Sort Order.
Example: In this example, we demonstrate how to display long-text content from the current entity in the Text Tab.
Scenario 1: An admin wants to display the Summary field of the Case entity in the Entity Tile.
Steps:
- Select Source in the Link Level field.
- In the Field Name field, select Summary.

Expected outcome:
When the Entity Tile is displayed, the system retrieves the value from the Summary field and displays it in the Text Tab of the Entity Tile.
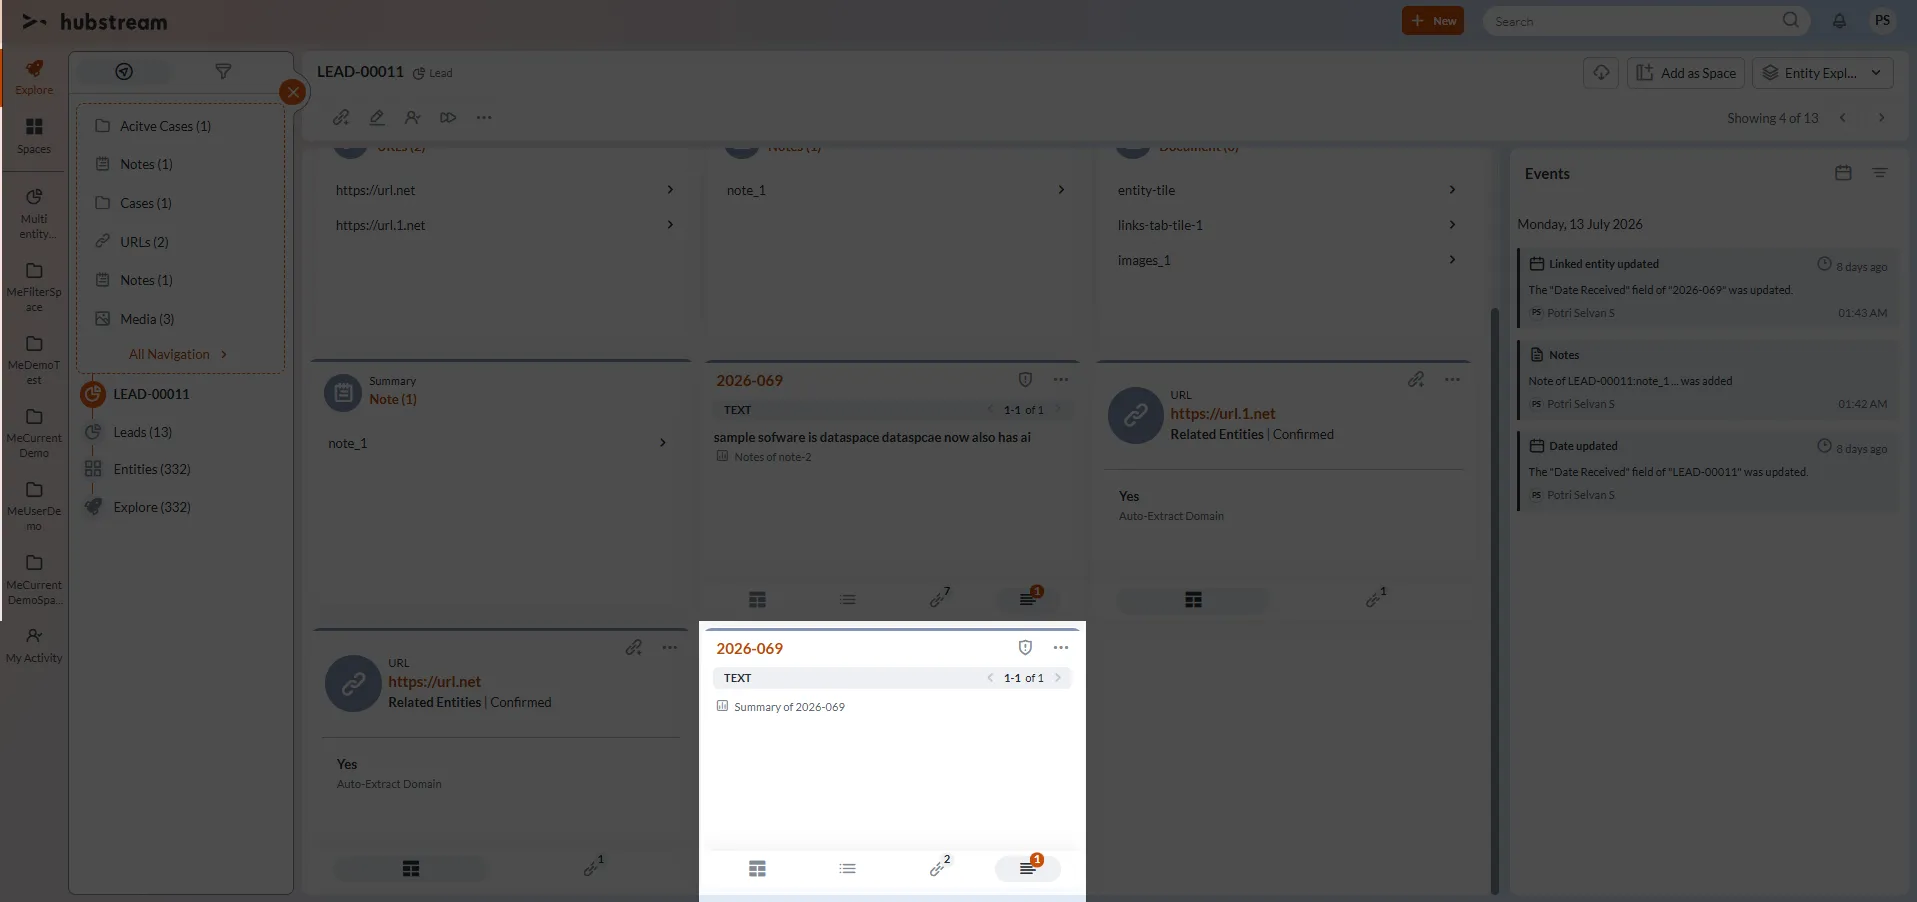
Scenario 2: An admin wants to display notes from a Note entity that is linked to a Case entity.
Steps:
- Select Closest in the Link Level field.
- In the Linked Entity Type field, select Note.
- In the Field Name field, select Notes.
- In the Sort By field, select Effective Date.
- In the Sort Order field, select Ascending.

Expected outcome:
When the Entity Tile is displayed, the system retrieves the linked Note entity data, sorts the notes by Effective Date in Ascending order, and displays the note content in the Text Tab of the Entity Tile.
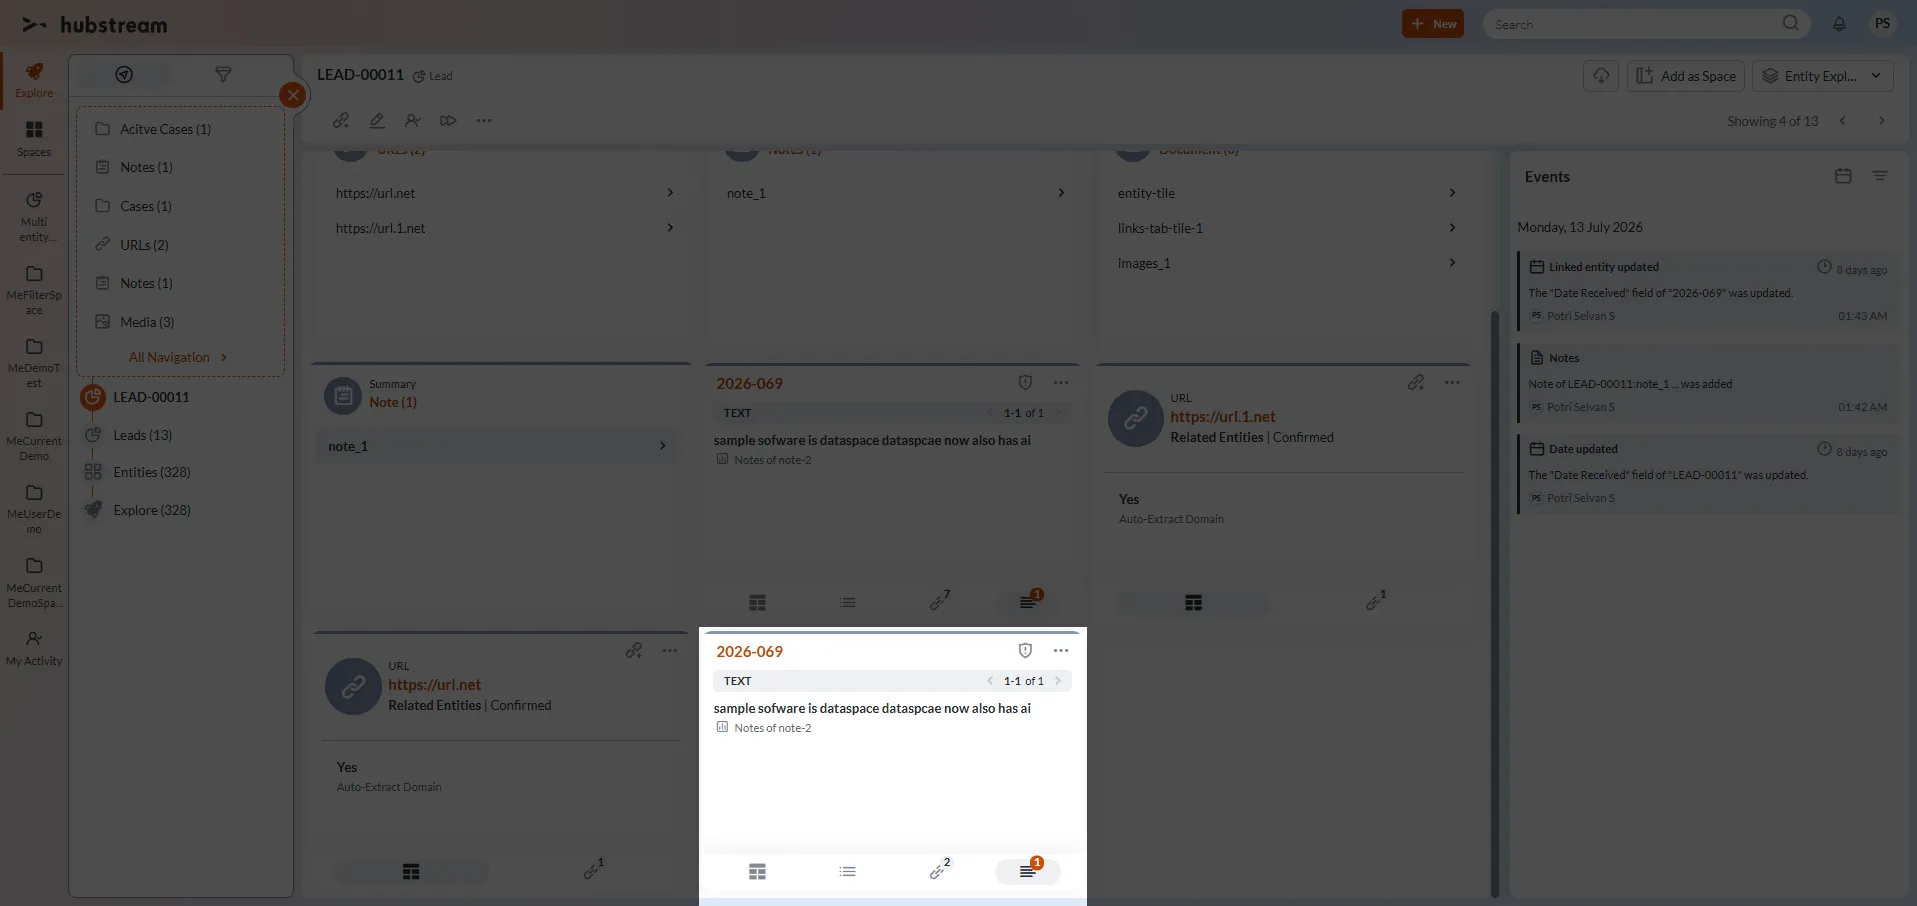
Text Tab Limitations
The Text Tab is designed to display long-text fields only.
When configuring the Text Tab:
- The selected entity must contain at least one long-text field.
- The Field Name field is mandatory.
- Only long-text fields are available for selection in the Field Name field.
If the selected entity does not contain any long-text fields, the Field Name list remains empty.
Examples:
- A Case entity containing a Summary field can be configured in the Text Tab because Summary is a long-text field.
- Entities such as Person, Document, or other entities without long-text fields may not provide any values in the Field Name field.
In such cases:
- The admin cannot select a Field Name.
- The rule cannot be saved because the Field Name field is mandatory.
- The system displays a validation message indicating that the Field Name field is required.
To save the Tile Rule, the admin must disable the Text Tab by selecting No in the Show Text Tab field.
Note: Enable the Text Tab only when the selected entity contains long-text fields that can be displayed within the tile. Otherwise, disable the Text Tab before saving the rule.
Preview Tab Customization
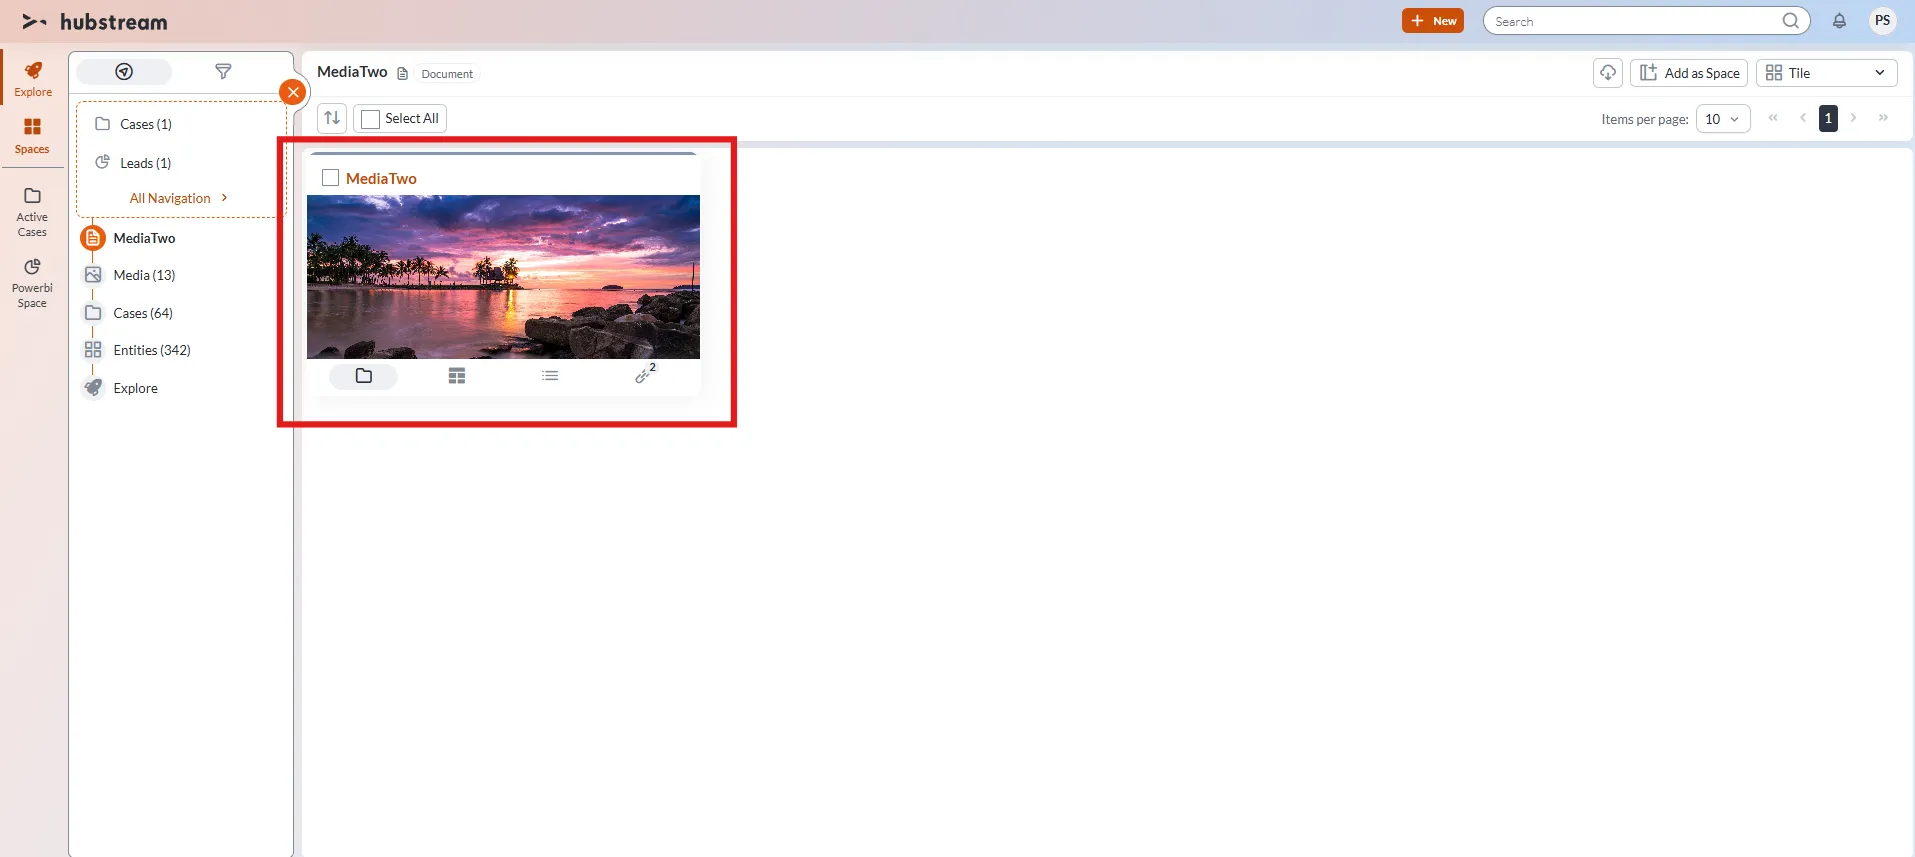
If the selected Query Entity Type is Document, an additional tile configuration tab becomes available.
The Document entity represents all document types available in the system, including files such as Word documents, Excel spreadsheets, PDFs, images, and other supported file formats.
- In the Tile Configuration section, select Yes in the Show Preview Tab field.
- The Preview Tab Customization section is displayed.
- Select the required Preview Style:
- Thumbnail – Displays a thumbnail preview of the document.
- File Type Icon – Displays an icon representing the document type.
Example: In this example, we demonstrate how to display a document preview within a Document Entity Tile.
Scenario: An admin wants to display a thumbnail preview of linked documents along with the document fields and linked entities in the Entity Tile.
Steps:
- In the Tile Configuration section, set Show Preview Tab to Yes.

- Navigate to the Preview Tab Customization section.
- In the Preview Style field, select Thumbnail.

Expected outcome:
When the rule is applied, the Document Entity Tile displays:
- A Preview Tab containing a thumbnail of the document.
- A Field Tab displaying configured document fields.
- A Links Tab displaying the entities in which the documents are linked.
Conditions
The Conditions section is used to determine where and when the tile should be displayed.
The system displays the tile only when all configured conditions are satisfied.
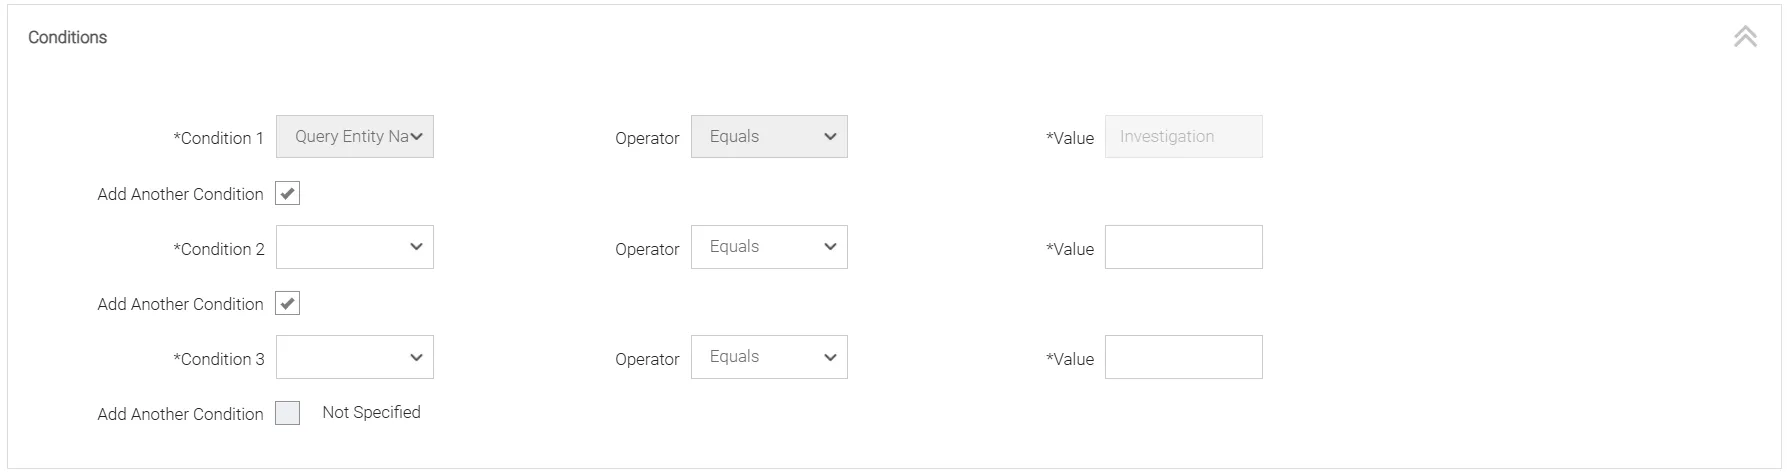
Admin can define three primary conditions to control the display of an entity tile:
- Query Entity Name
- Parent Entity Name
- Query Result Count
These conditions are mandatory for Entity Tile Rules. Administrators can add additional conditions as required to further refine when and where the tile is displayed.
To configure conditions:
- In the Condition field, select the required condition.
- Select the required Operator.
- Enter the required Value.
- To add another condition, select Add Another Condition.
- Repeat the process for each additional condition.
Note: When a rule is created from an entity page (for example, Case or Lead), the system automatically sets the Query Entity Type to that entity.
Example: In this example, we demonstrate how to display a Case Entity Tile on a Lead Entity Explorer page when one or more linked Case entities exist.
Scenario: An admin wants to display Case information on a Lead Entity Explorer page whenever the Lead entity has one or more linked Case entities.
Steps:
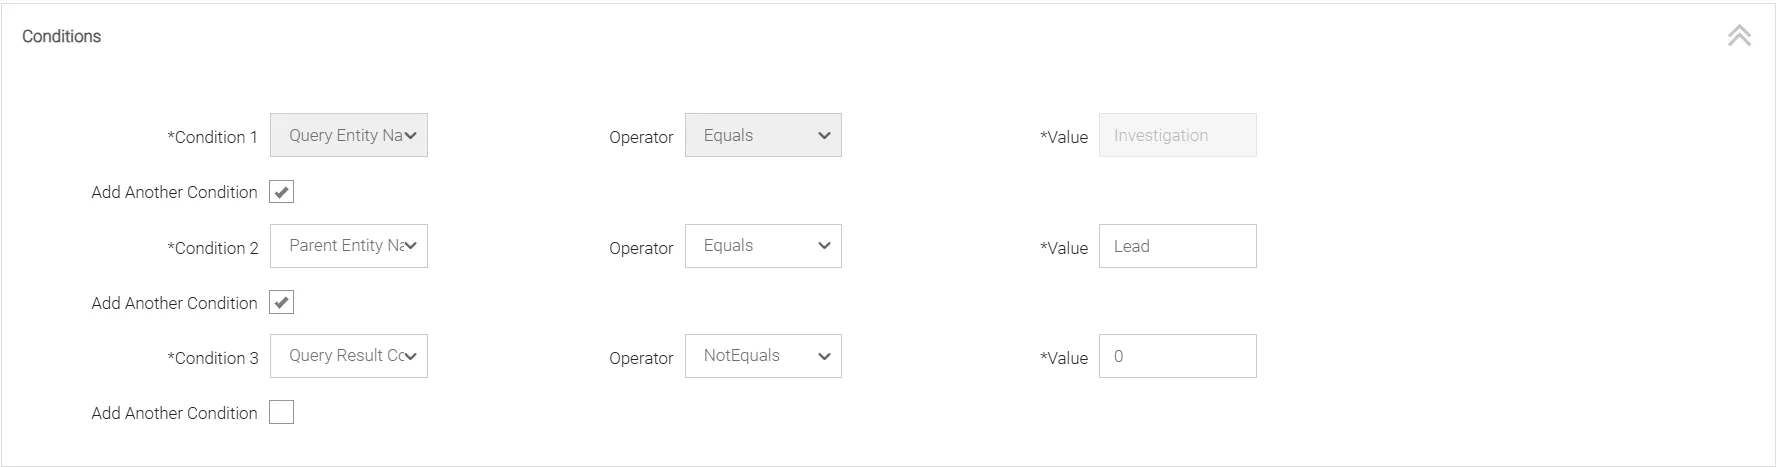
- In Condition 1, select Query Entity Name.
- Select Equals as the operator.
- Enter Investigation as the value.
This condition identifies the entity associated with the tile rule. The system evaluates only entities whose system-defined name is Investigation.
Note: Use the system-defined entity name when configuring conditions. Do not use the entity caption. For example, Investigation is the system-defined name of the Case entity and should be used when defining conditions.
- Click Add Another Condition.
- In Condition 2, select Parent Entity Name.
- Select Equals as the operator.
- Enter Lead as the value.
This condition specifies where the tile should be displayed. The tile is displayed only when the parent entity is Lead.
- Click Add Another Condition.
- In Condition 3, select Query Result Count.
- Select Not Equals as the operator.
Note: Currently, the system supports the Equals, NotEquals, and In operators for Entity Tile conditions.
- Enter 0 as the value.
This condition ensures that the tile is displayed only when one or more linked query entities exist.
Saving the Rule
- Review the rule configurations.
- Click Save to save the rule.
Note: After a rule is saved, the system evaluates the configured conditions whenever the applicable entity is accessed. The tile is displayed only when all configured rule conditions are satisfied. If one or more conditions are not satisfied, the tile is not displayed in the entity explorer.
Expected outcomes
When the rule conditions are satisfied:
- The tile is associated with the Case entity.
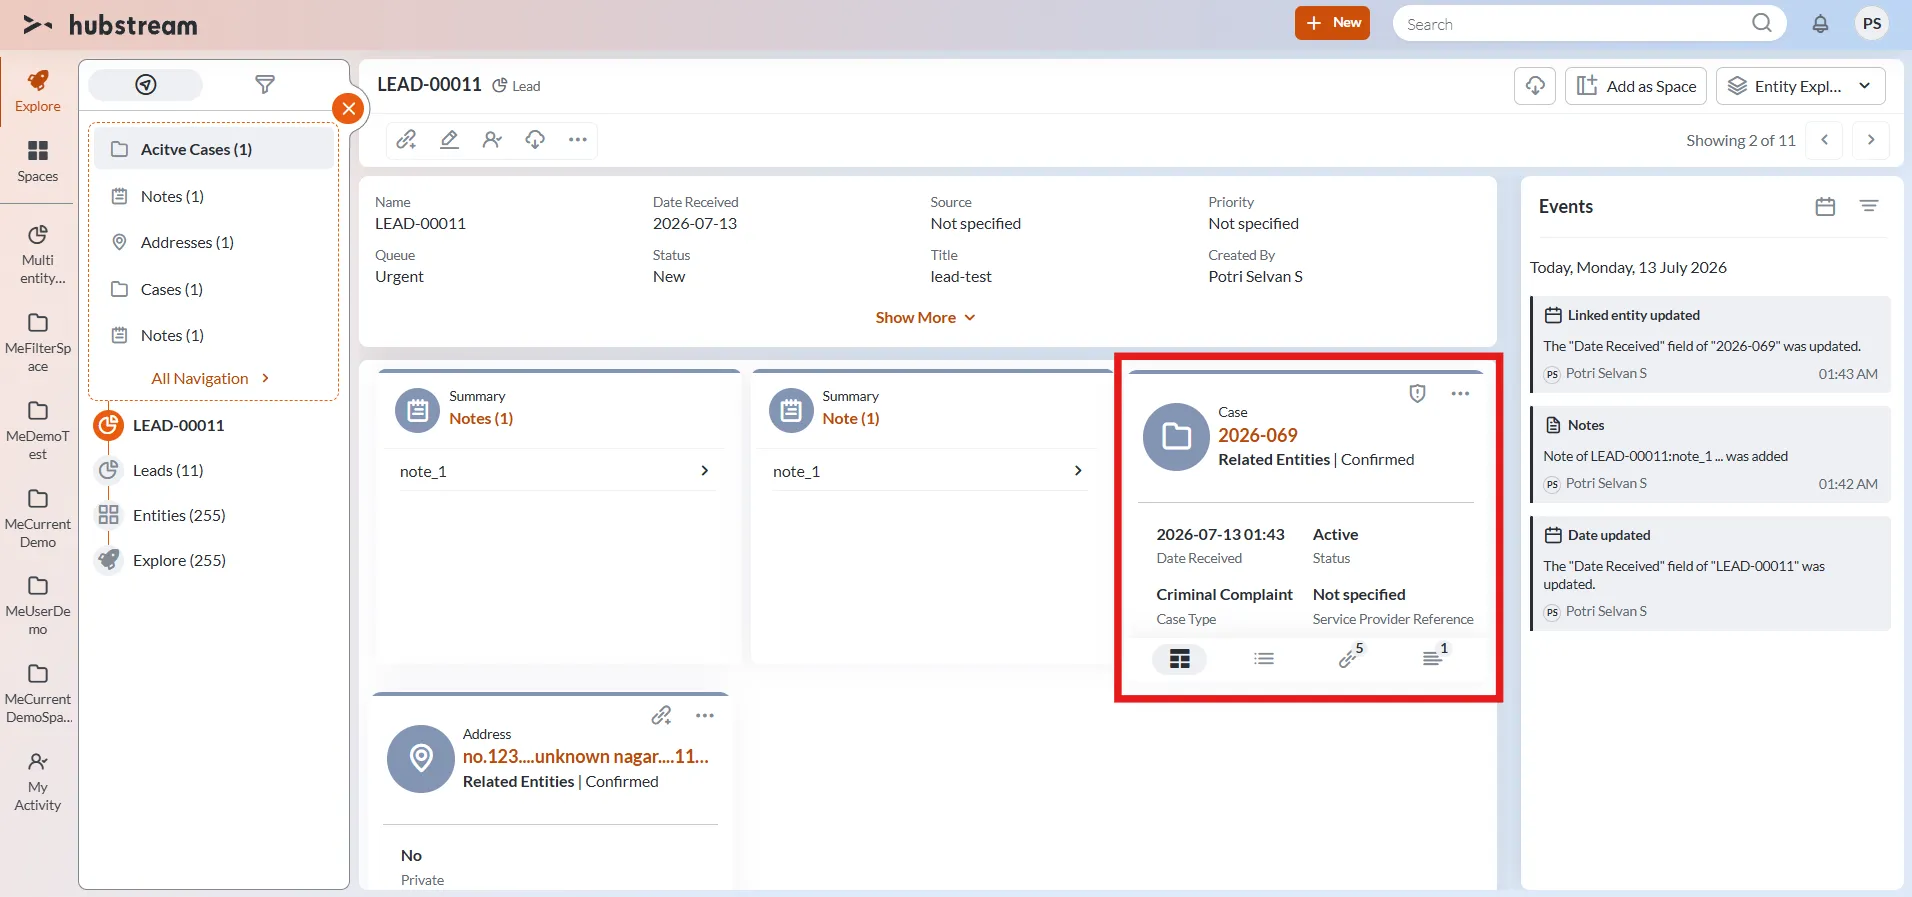
- The case entity tile is displayed on the Lead Entity Explorer page.
- The tile is displayed only when one or more linked Case entities exist.
- The tile is not displayed when no linked Case entities are available.
- If Show Field Tab was selected Yes, the fields configured through the entity’s Field Visibility Properties are displayed in the tile.
- If Show Text Tab was selected Yes, the configured long-text content (for example, Summary or Notes) is displayed in the Text Tab.
- If Show Links Tab was selected Yes, the configured linked entities are displayed in the Links Tab.
- If Show Preview Tab was selected for a Document entity, a document preview is displayed in the tile based on the selected preview type (Thumbnail or File Type Icon).
- The tile header displays the entity caption and available actions.
- If a Promoted Action is configured for the entity, the promoted action is displayed directly in the tile header for quick access.
Note: To configure a Promoted Action for an entity, refer to the Action Rule section.
- If no promoted action is configured, the system displays an action in the tile header based on the configured action order or sequence.
- Additional actions, such as Edit, Assign, Delete, Download, and Add Link, are available through the More Options menu.
Note: The tile header is the top section of the Entity Tile. It contains the entity title, primary actions, and the More Options menu.
Examples
The following examples demonstrate how to create a custom Entity Tile Rule and display it on the entity explorer page.
Scenario 1:
As an admin, you want to display an Active Case Entity Tile on the Lead Entity Explorer page. Follow the below steps:
Requirement:
Display an Active Case Entity Tile on the Lead Entity Explorer page only when:
- A linked Case entity exists.
- The Case entity status is Active.
Configuration
Section 1: Rule Info
- Navigate to the Rules page of the Case entity.
- Click the plus (+) icon.
- Enter a rule name in the Name field.
- Example: Active Cases tile on lead
- Select Tile from the Rule Type dropdown list.
- Select Entity Tile from the Tile Type dropdown list.
- Select the required Scope (Insight / Tile View).
Section 2: Query
- In the Query Entity Type field, the case entity (Investigation) was selected by default.
- In the Link Level field, select Closest.
- Configure the following query filter:
- Field Filter = Status
- Operator = Equals
- Value = Active
- Click Add Another Filter if additional filters are required. You can configure up to three query filters for a rule.
Section 3: Tile Configuration
- In Show Field Tab, select Yes / No.
- In Show Text Tab, select Yes / No.
- In Show Links Tab, select Yes / No.
When Yes is selected for a tab option, the corresponding tab becomes available in the form.
The corresponding tab is hidden when No is selected.
Depending on the selected options, configure the available tabs.
Section 4: Conditions
Configure the following conditions:
Condition 1 (Selected by default)
- Condition 1 = Query Entity Name
- Operator = Equals
- Value = Investigation
Condition 2
- Condition 2 = Parent Entity Name
- Operator = Equals
- Value = Lead
Condition 3
- Condition 3 = Query Result Count
- Operator = Not Equals
- Value = 0
Save the Rule
- Review the rule configuration.
- Click Save to save the rule.
Expected outcomes:
When a Lead entity contains one or more linked Case entities with a status of Active:
- The Case Entity Tile is displayed on the Lead Entity Explorer page.
- If Show Fields Tab was selected Yes, the tile displays the configured entity fields.
- If Show Links Tab was selected Yes, the tile displays linked entities in the Links Tab.
- If Show Texts Tab was selected Yes, the tile displays the entity’s long text content in the Text Tab.
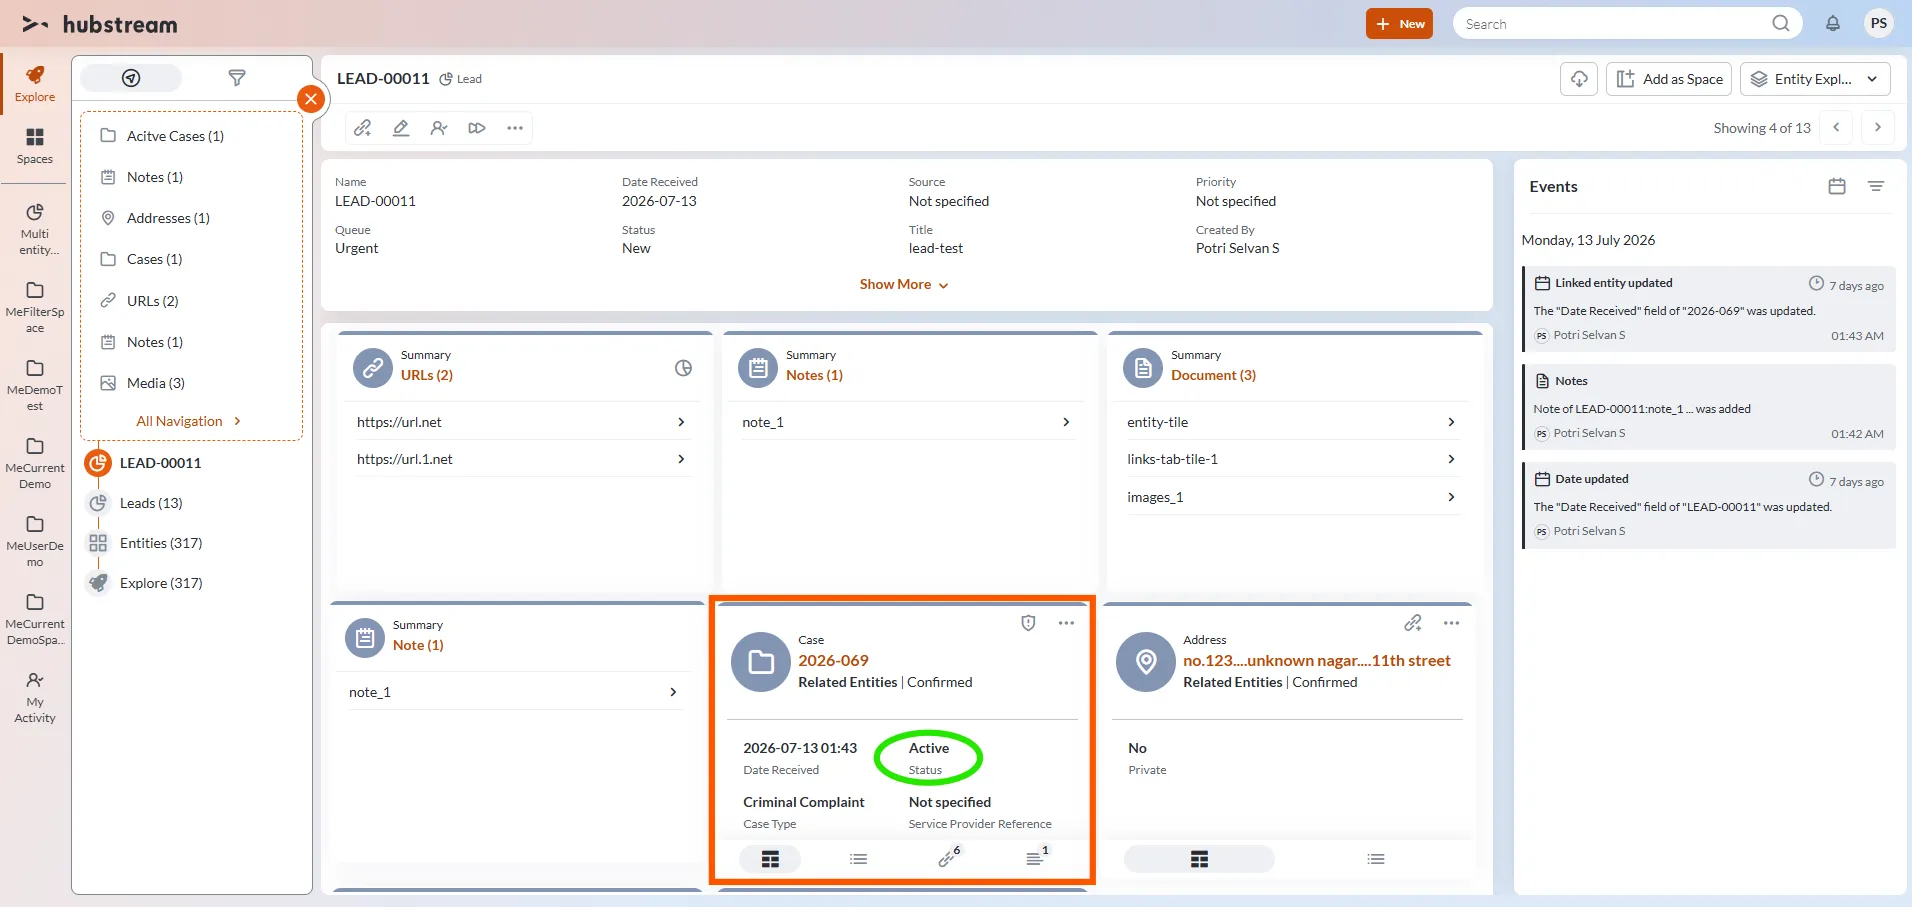
- If the Case status changes to Pending, Hold, or Completed:
- The Case entity no longer satisfies the query filter conditions.
- The Case tile is not displayed.
- The tile header displays the entity caption, promoted action, and More Options menu.
- If a Promoted Action is configured for the entity, the promoted action is displayed directly in the tile header for quick access.
- Additional actions, such as Edit, Assign, Delete, Download, and Add Link, are available through the More Options menu.
- The tile is displayed only when one or more linked Case entities exist. The tile is not displayed when no linked Case entities are available.
Scenario 2:
As an admin, you want to create a custom tile which displays an In-Progress Tasks entity tile on Active Case insights. Follow the below steps:
Requirement
Display a Task Entity Tile on the Active Case entity explorer page only when:
- A linked Task entity exists.
- The Task status is In Progress.
- The parent Case entity status is Active.
Configuration
Section 1: Rule Info
- Navigate to the Rules page of the Task entity.
- Click the plus (+) icon.
- Enter a rule name in the Name field.
- Example: In-Progress Tasks on Active Cases
- Select Tile from the Rule Type dropdown list.
- Select Entity Tile from the Tile Type dropdown list.
- Select Insight in the Scope field.
Section 2: Query
- In the Query Entity Type field, Task is selected.
- In the Link Level field, select Closest.
- Configure the following query filter:
- Field Filter = Task Status
- Operator = Equals
- Value = In Progress
Section 3: Tile Configuration
- In Show Field Tab, select Yes / No.
- In Show Text Tab, select Yes / No.
- In Show Links Tab, select Yes / No.
When Yes is selected for a tab option, the corresponding tab becomes available in the form.
The corresponding tab is hidden when No is selected.
Depending on the selected options, configure the available tabs.
Section 4: Conditions
Configure the following conditions:
Condition 1 (Selected by default)
- Condition 1 = Query Entity Name
- Operator = Equals
- Value = Task
Condition 2
- Condition 2 = Parent Entity Name
- Operator = Equals
- Value = Investigation
Condition 3
- Condition 3 = Query Result Count
- Operator = Not Equals
- Value = 0
Condition 4
- Condition 4 = Parent Field Filter
- Field Name = Status
- Operator = Equals
- Value = Active
Save the Rule
- Review the rule configuration.
- Click Save to save the rule.
Expected outcomes:
When an Active Case entity contains one or more linked Task entities with a status of In Progress:
- The Task Entity Tile is displayed on the Case Entity Explorer page.
- If Show Field Tab is enabled, the tile displays the configured Task fields.
- If Show Links Tab is enabled, the tile displays linked entities in the Links Tab.
- If Show Text Tab is enabled, the tile displays the Task’s long-text content in the Text Tab.
- The tile header displays the entity caption, promoted action, and More Options menu.
- If a Promoted Action is configured for the Task entity, the action is displayed directly in the tile header.
- Additional actions, such as Edit, Assign, Delete, Download, and Add Link, are available through the More Options menu.
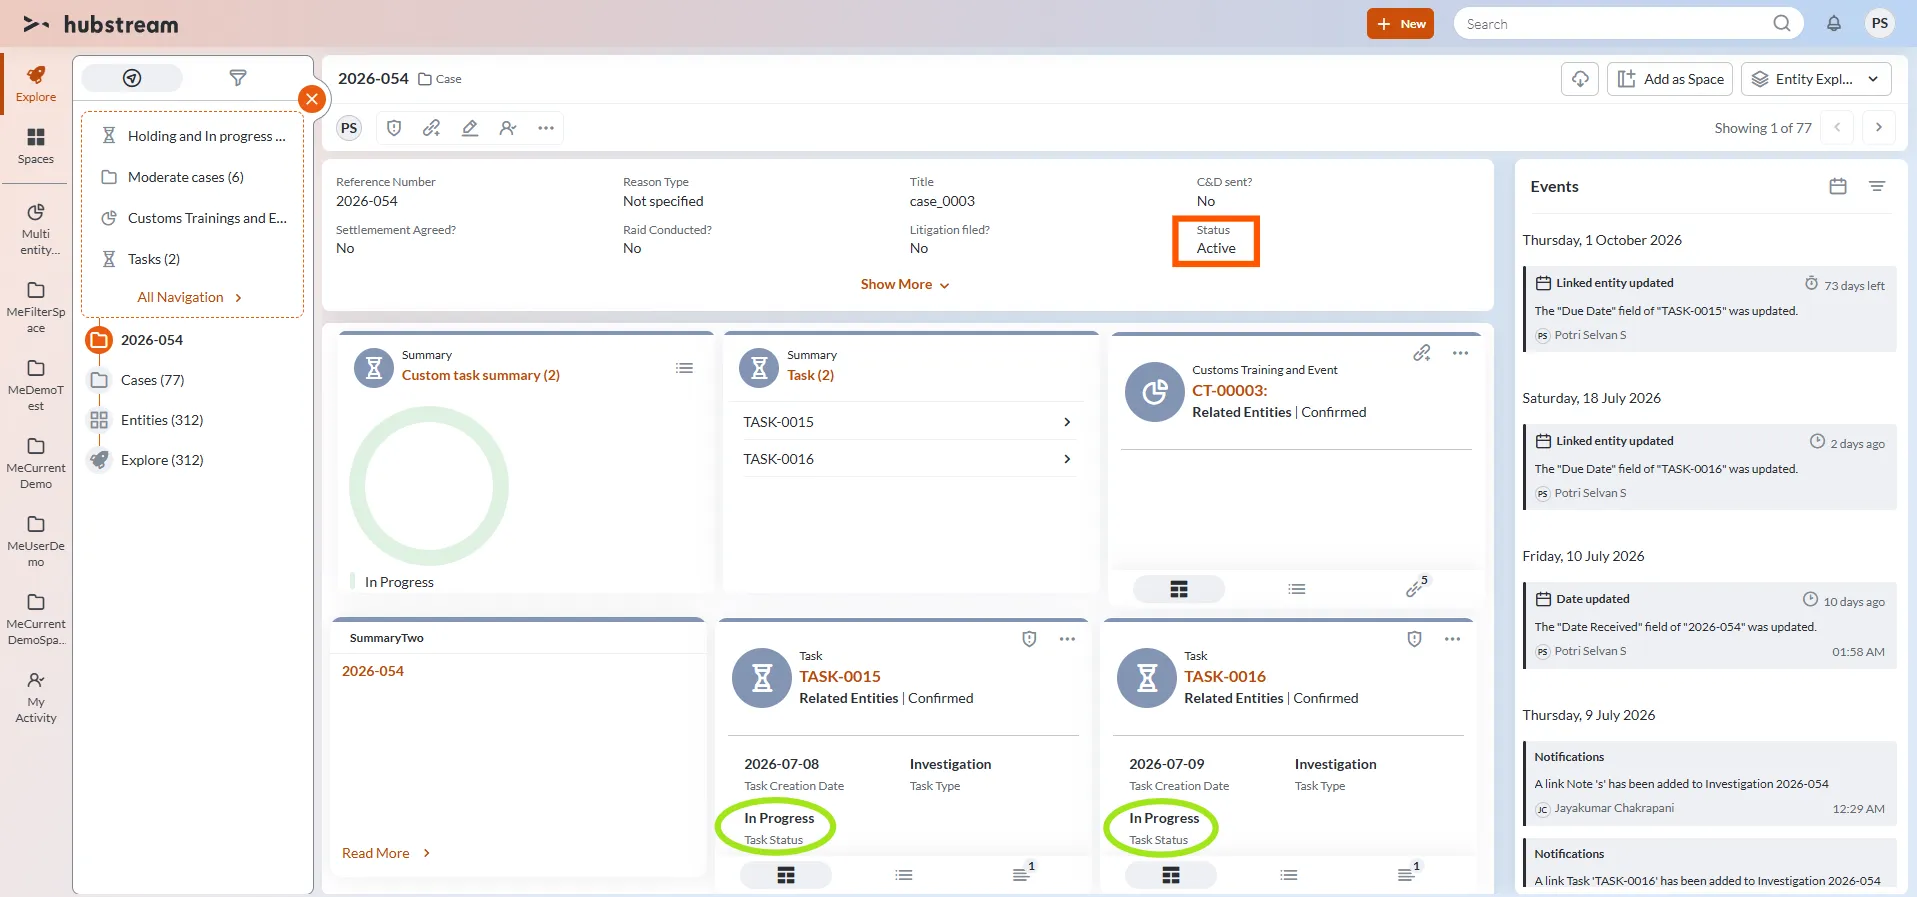
The Task Entity Tile is not displayed when:
- No linked Task entities exist.
- The Task status is not In Progress.
- The parent Case status is not Active.