Summary Tile
A Summary Tile provides a summarized view of linked entities associated with the current entity.
Using a Summary Tile, users can:
- View the total number of linked entities of a specific entity type (for example, URLs, Tasks, Companies, or Cases).
- View a list of linked entities.
- Visualize and analyze entity data using charts based on selected fields, such as Status, Type, Country, or Priority.
- Access entity details directly from the Summary Tile.
- View entity details by expanding the Summary Tile using the Navigate Right arrow.
- Review entity details without navigating away from the current Entity Explorer page.
Creating a Summary Tile Rule
As an Admin, you can create a Summary Tile Rule. Follow these steps:
- Navigate to the entity’s Rules page.
- Click the plus (+) icon in the header. The New Rule pop-up form will be displayed.
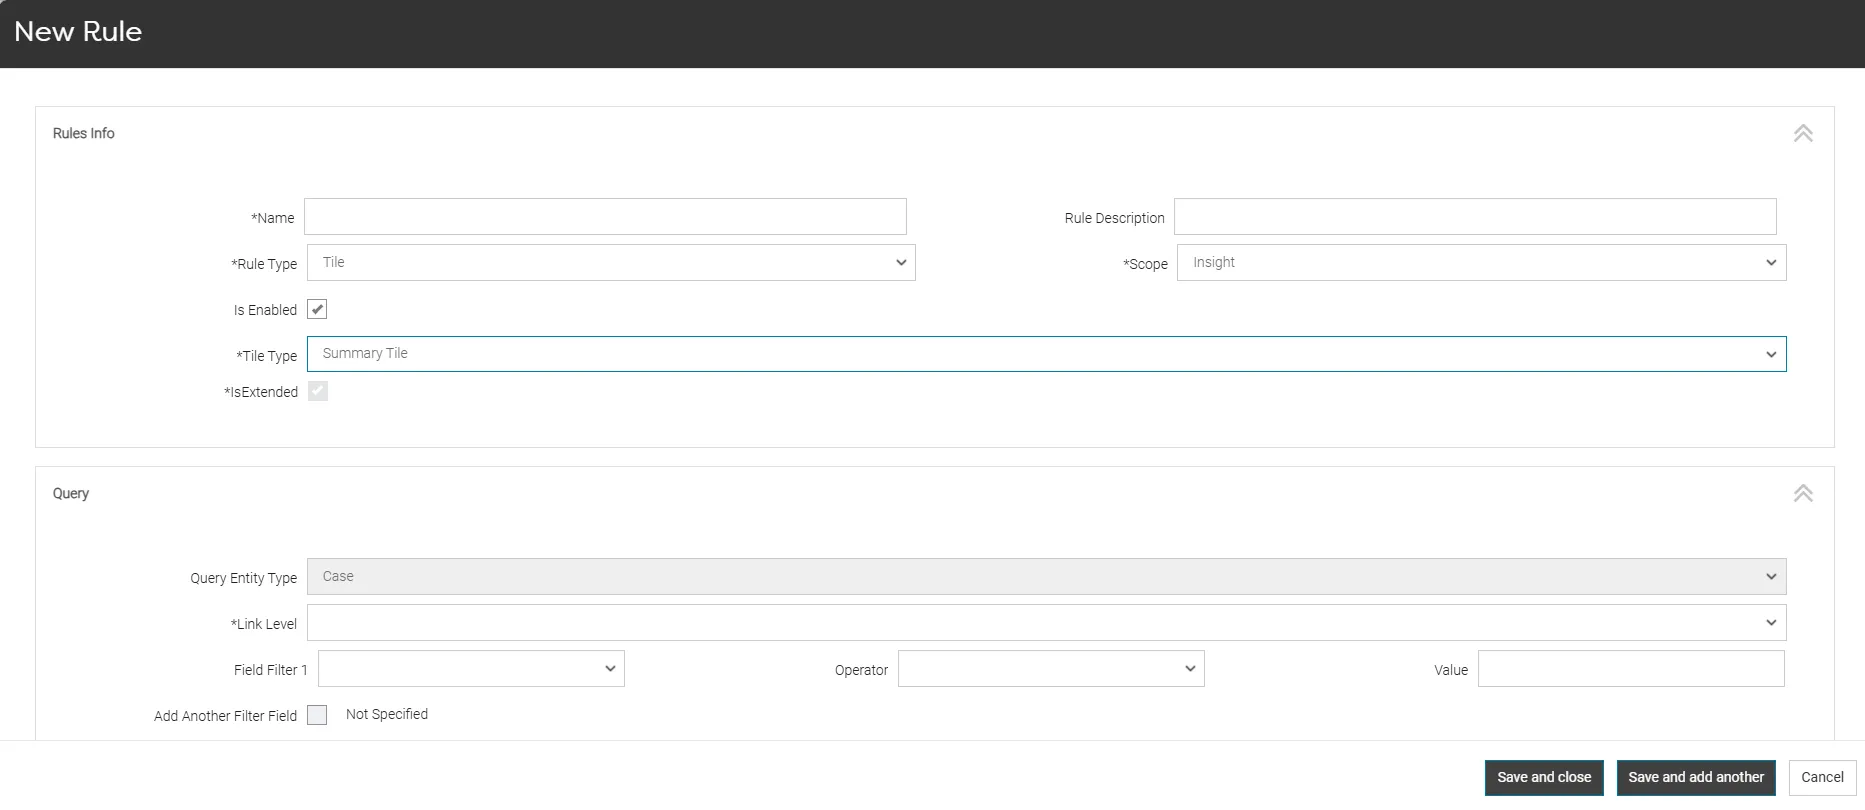
Rule Info
- Enter a rule name in the Name field.
- Select Tile from the Rule Type dropdown list.
- Select Summary Tile from the Tile Type dropdown list.
- Select the required Scope (Insight or Tile View).
Note: Currently, the platform supports the Insight and Tile View scope types. These options are available for selection in the rule form. Scope options may be removed in future platform releases.
Query
The Query section defines the entity from which the tile retrieves information.
- Select the required Query Entity Type.
Note: When a rule is created from an entity page (for example, Case or Lead), the system automatically sets the Query Entity Type to that entity.
- Select the required Link Level.
- If required, configure a query filter by selecting:
- Field Filter
- Operator
- Value
- To add additional filters, select Add Another Filter. You can configure up to three query filters for a rule.

Tile Details
The Tile Details section is used to customize the appearance of the tile.
- Enter a value in the Tile Caption field.
- Enter the required icon name in the Icon field.

Sort Order
The Sort Order section determines how entities are organized and displayed within the Summary Tile.
- In the Sort Field 1 field, select the field to be used for sorting the entities (for example, Country, Name, Date Created, or Date Updated).
- In the Sort Order field, select the required sort order.
Note: The platform uses Ascending as the default sort order when no sort order is specified.

Additional Visualization
The Additional Visualization section is used to present summarized entity information in a visual format within the Summary Tile.
- In the Visualization field, select the required visualization type (Chart).

Note: The platform currently supports only Chart as the visualization type. Within chart visualizations, only the Donut chart type is available.
- In the Chart Type field, select the required chart type (Donut).
- In the Field On Chart field, select the entity field to be represented in the chart.
- If the selected visualization should be displayed by default when the Summary Tile is loaded, select the Is Default View checkbox.

Conditions
The Conditions section determines where and when the Summary Tile is displayed.
- In the Condition field, select the required condition.
- Select the required Operator.
- Enter the required Value.
- To add another condition, select Add Another Condition.
- Repeat the process for each additional condition.
Save the Rule
- Review the rule configuration.
- Click Save.
Note: After a rule is saved, the system evaluates the configured conditions whenever the applicable entity is accessed. The tile is displayed only when all configured rule conditions are satisfied. If one or more conditions are not satisfied, the tile is not displayed in the entity explorer.
Examples
The following examples demonstrate how to create a Custom Summary Tile Rule and display it on the entity explorer page.
Scenario 1:
As an admin, you want to display a summary of URLs linked to a Lead entity. The Summary Tile should display:
- The total number of linked URLs.
- A donut chart categorizing the URLs by Type.
Follow the below steps:
Configuration
Section 1: Rule Info
- Navigate to the Rules page of the URL entity.
- Click the plus (+) icon.
- Enter a rule name in the Name field. (Eg. Custom_Summary_Tile)
- Select Tile from the Rule Type dropdown list.
- Select Summary Tile from the Tile Type dropdown list.
- Select the required Scope (Insight or Tile View).
Section 2: Query
- In the Query Entity Type field, the URL entity was selected by default.
- Select Closest in the Link Level field.
- Leave the query filter empty or configure filters as required.
Section 3: Tile Details
- Enter a value in the Tile Caption field. (Eg. URLs)
- Enter the icon name in the Icon field. (Eg. URL)
Section 4: Sort Order
- Select the Date Created entity field in the Sort Field field.
- Select Ascending in the Sort Order field.
Section 5: Additional Visualization
- Select Chart in the Visualization field.
- Select Donut Chart in the Chart Type field.
- Select the Type entity field in the Field On Chart field.
Section 6: Conditions
Configure the following conditions:
Condition 1 (Selected by default)
- Condition 1 = Query Entity Name
- Operator = Equals
- Value = URL
Condition 2
- Condition 2 = Parent Entity Name
- Operator = Equals
- Value = Lead
Condition 3
- Condition 3 = Query Result Count
- Operator = Equals
- Value = 3
Expected outcomes:
When the rule conditions are satisfied:
- A Summary Tile is displayed on the Lead Entity Explorer page.
- The tile header displays the configured tile caption (URLs), URL icon, and total number of linked URLs (2).
- The tile displays the linked URLs in list view.
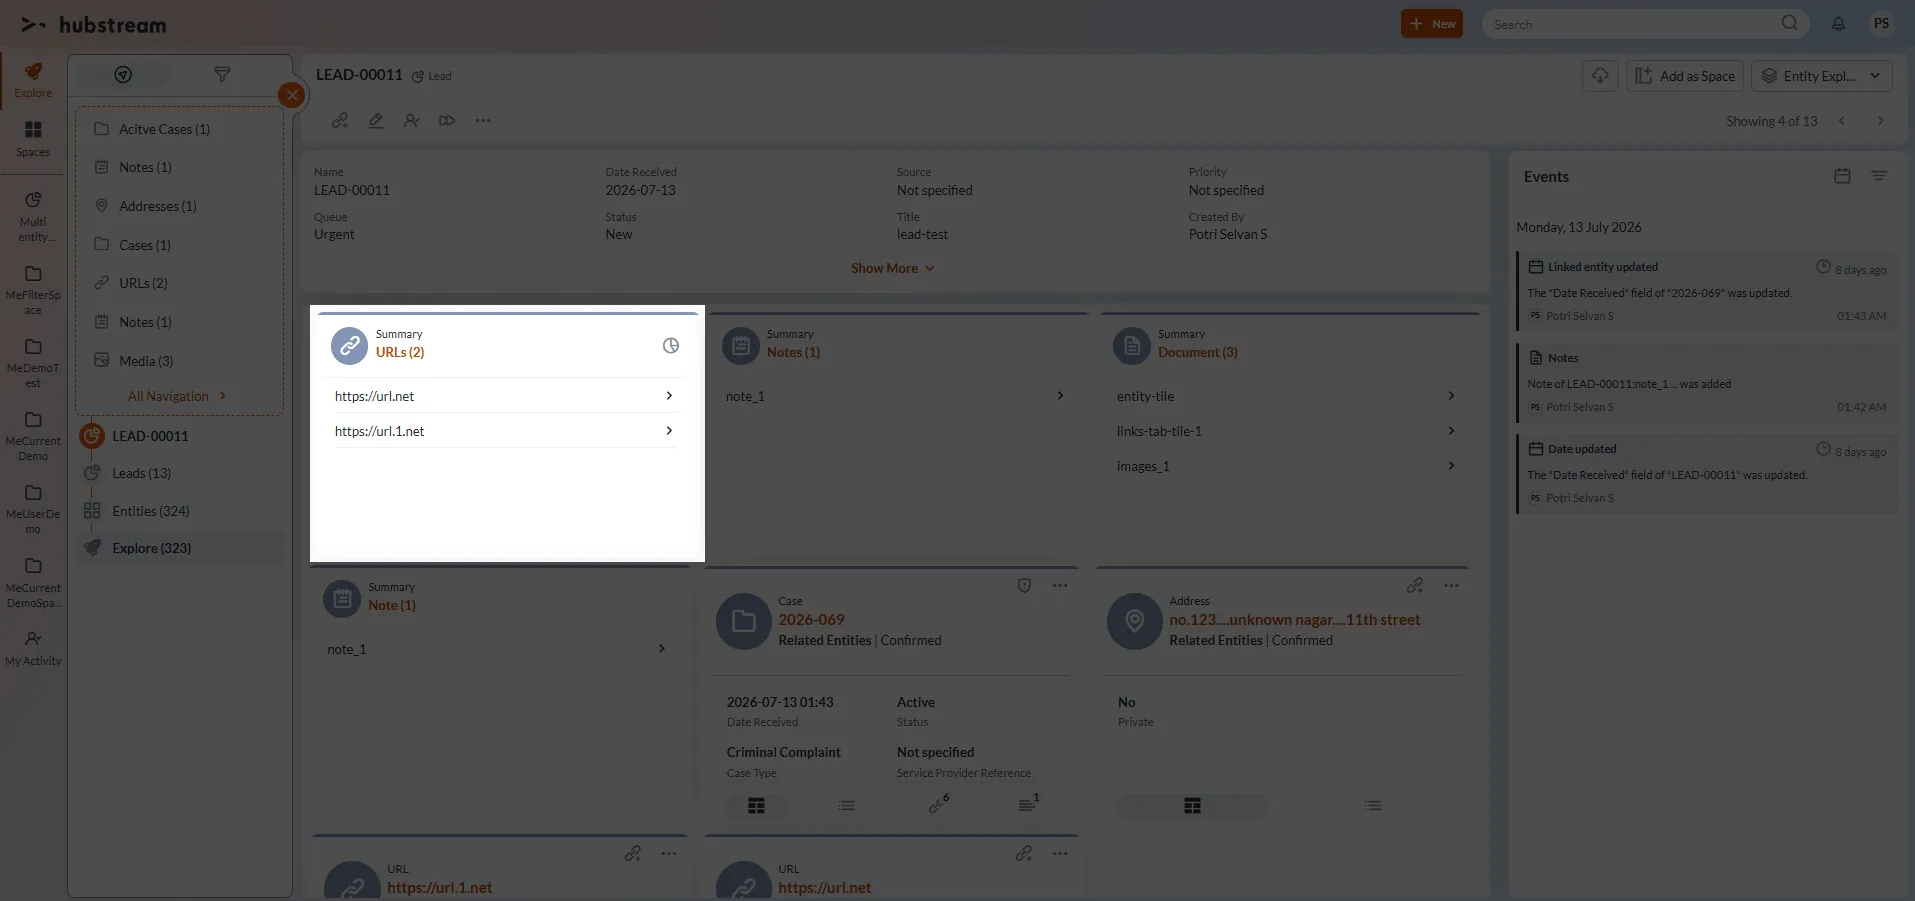
- A Donut Chart categorizes the URLs based on their Type.
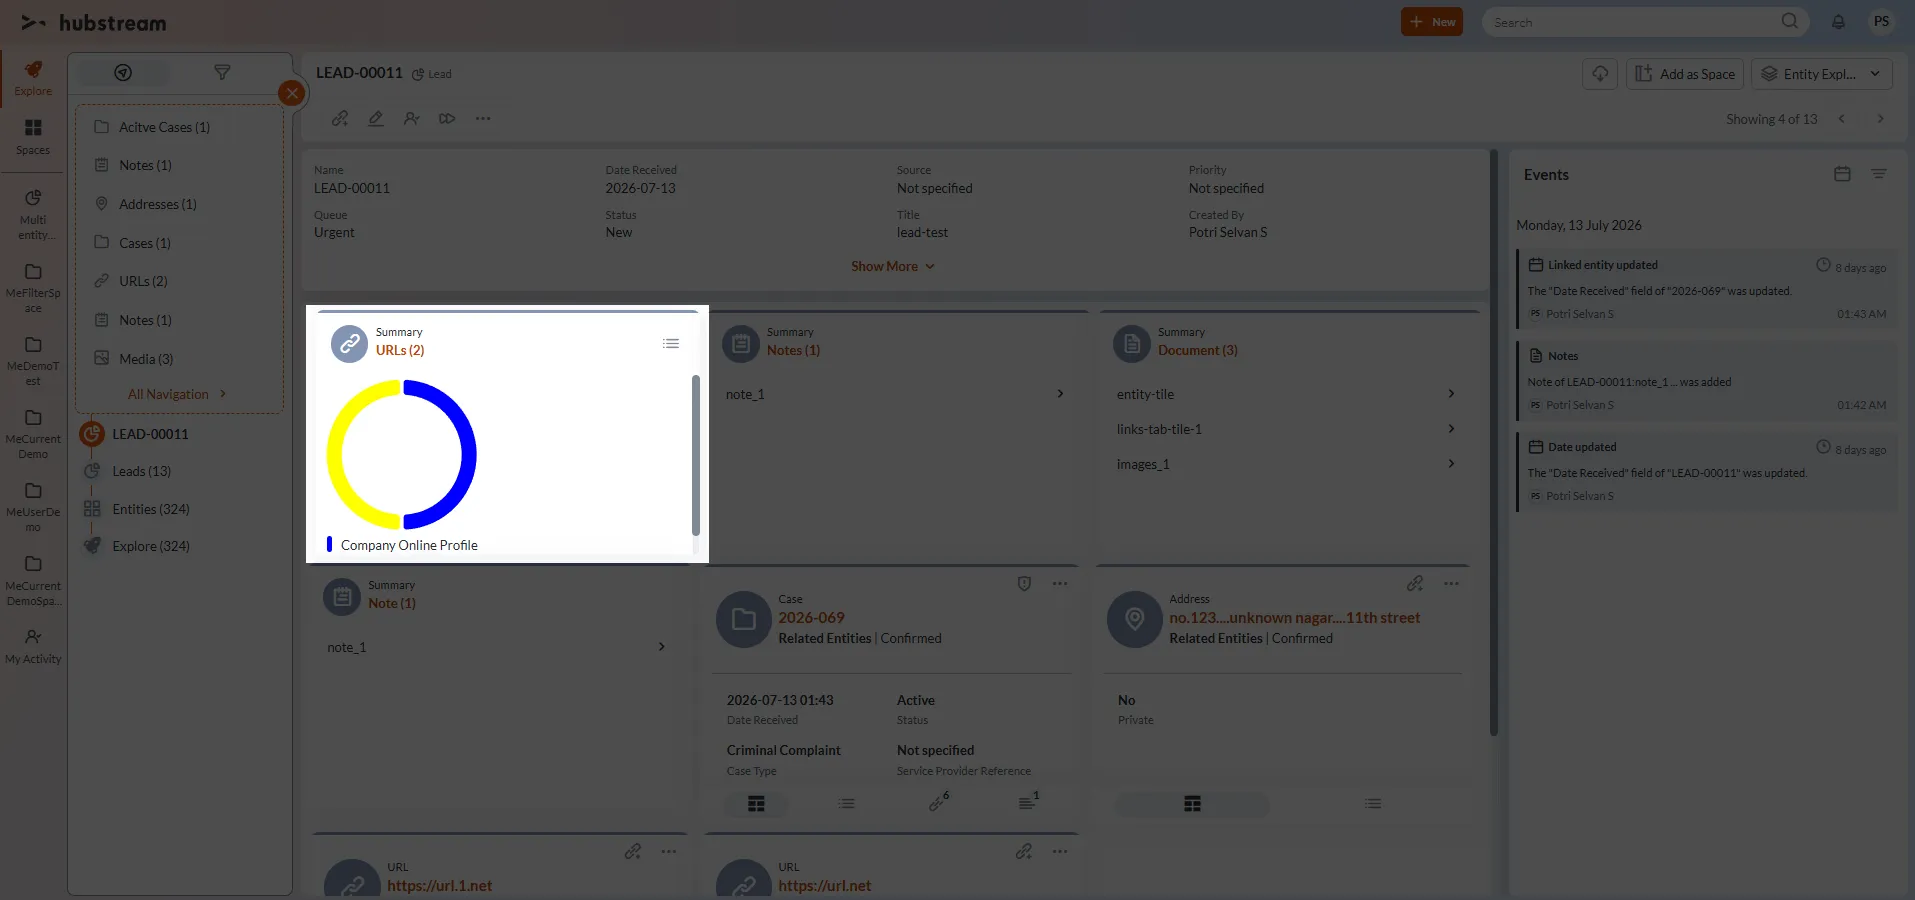
- Users can switch from the Donut Chart view to the List View by selecting the List View icon in the tile header.
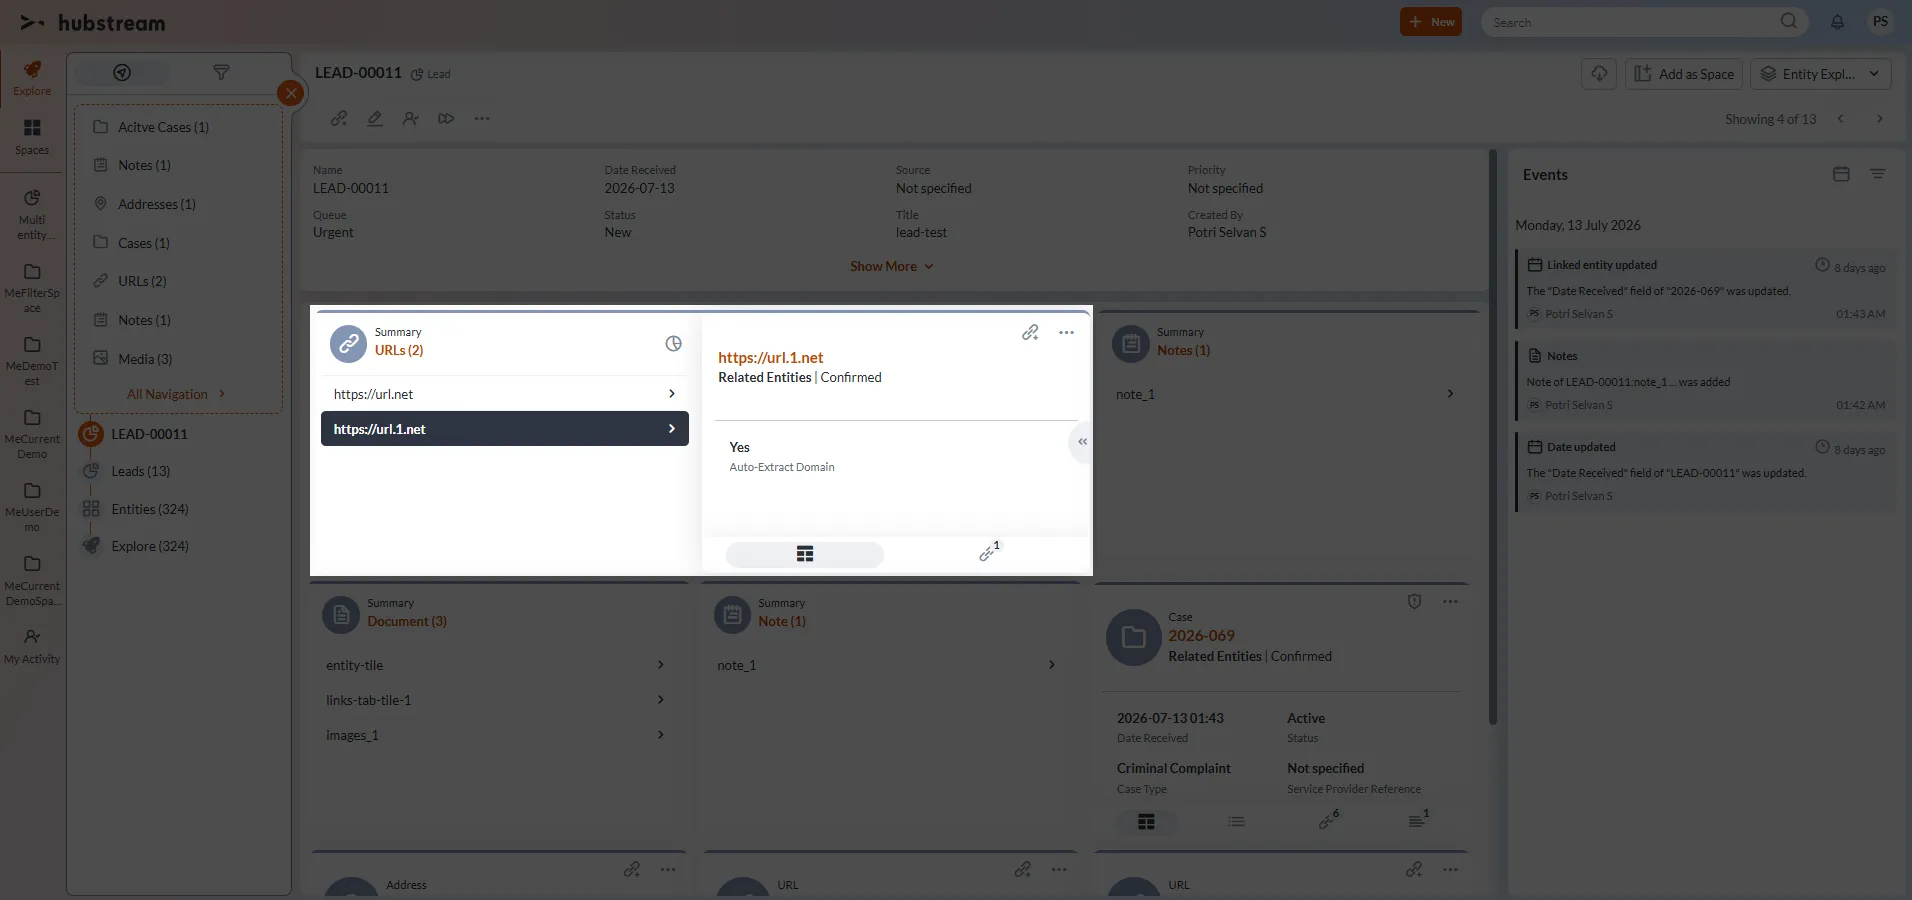
- Each URL is displayed with a Navigate Right arrow.
- Selecting the Navigate Right arrow opens the corresponding URL entity details by expanding the summary tile within the Entity Explorer.
- The user remains on the current page and is not redirected to a separate detail page.
Scenario 2:
As an admin, you want to display a summary of all Task entities linked to a Case entity. The Summary Tile should help users quickly identify the number of tasks in different statuses, such as:
- Not Started
- In Progress
- Holding
- Completed
The summary should be displayed on the Case Entity Explorer page without redirecting users to review each Task individually. Follow the below steps:
Configuration
Section 1: Rule Info
- Navigate to the Rules page of the Task entity.
- Click the plus (+) icon.
- Enter a rule name in the Name field. (Eg. Custom_Task_Summary)
- Select Tile from the Rule Type dropdown list.
- Select Summary Tile from the Tile Type dropdown list.
- Select the required Scope (Insight or Tile View).
Section 2: Query
- In the Query Entity Type field, the Task entity was selected by default.
- Select Closest in the Link Level field.
- Leave the query filter empty to include all linked Task entities.
Section 3: Tile Details
- Enter a value in the Tile Caption field. (Eg. Custom Task Summary)
- Enter Task in the Icon field.
Section 4: Sort Order
- Select Date Created in the Sort Field field.
- Select Ascending in the Sort Order field.
Section 5: Additional Visualization
- Select Chart in the Visualization field.
- Select Donut Chart in the Chart Type field.
- Select Task Status in the Field On Chart field.
- Select Is Default View.
Section 6: Conditions
Configure the following conditions:
Condition 1 (Selected by default)
- Condition 1 = Query Entity Name
- Operator = Equals
- Value = Task
Condition 2
- Condition 2 = Parent Entity Name
- Operator = Equals
- Value = Investigation
Note: Investigation is the system-defined name of the Case entity.
Condition 3
- Condition 3 = Query Result Count
- Operator = Not Equals
- Value = 0
Expected outcomes:
When the rule conditions are satisfied:
- A Task Summary Tile is displayed on the Case Entity Explorer page.
- The tile header displays the configured tile caption (Custom Task Summary), Task icon, and number of tasks.
- The Donut Chart is displayed as the default view of the Summary Tile.
- The Chart categorizes the Tasks based on their Task Status.
- Users can quickly identify how many Tasks are In Progress, On Hold, Completed, or in other status categories.
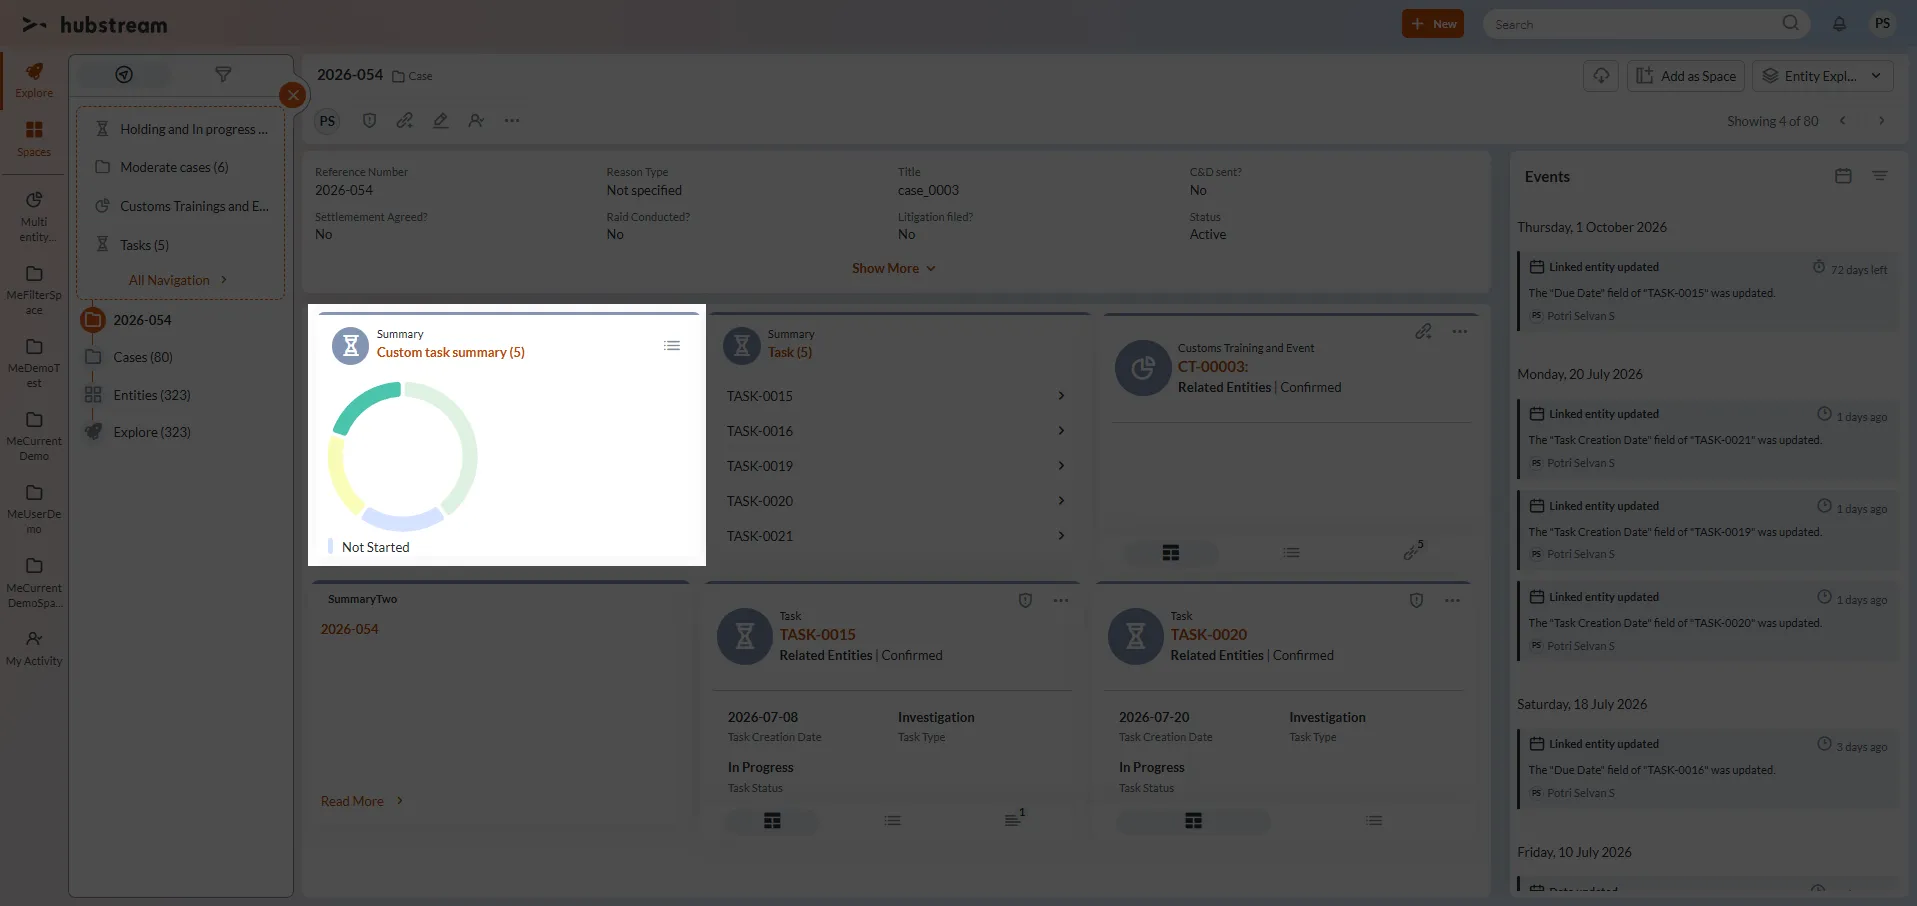
- Users can switch from the Donut Chart view to the List View by selecting the list view icon in the tile header.
- The tile displays a list of linked Task entities.
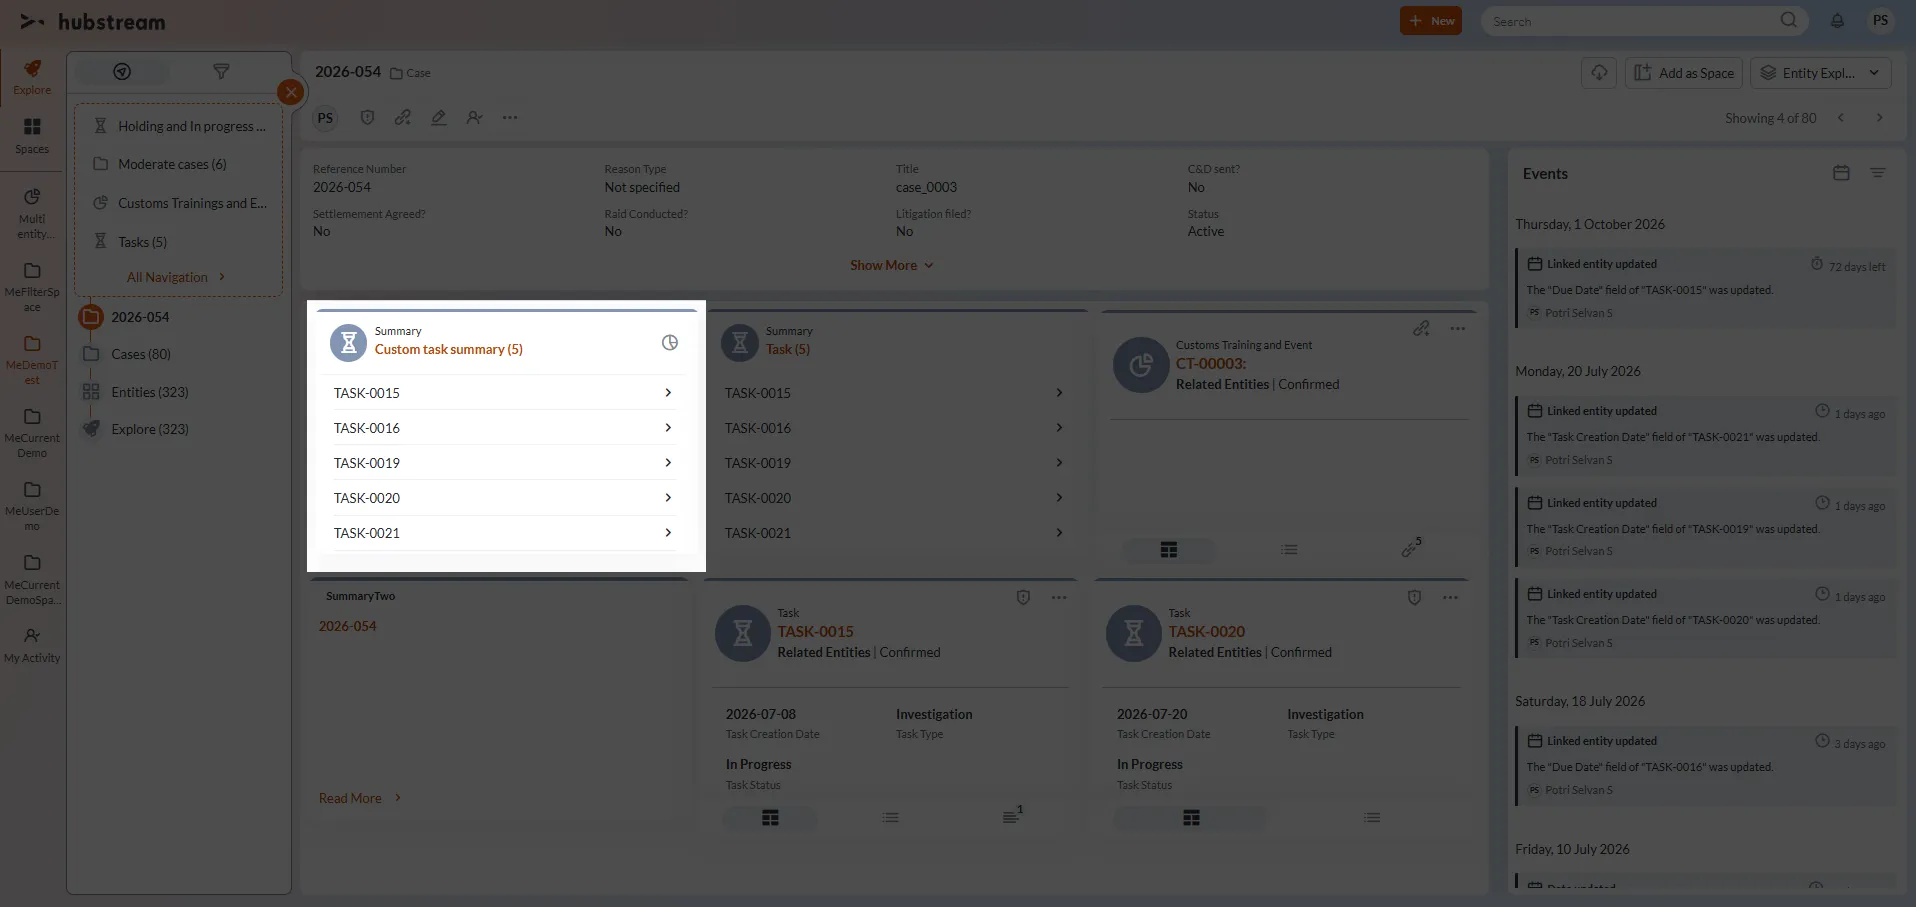
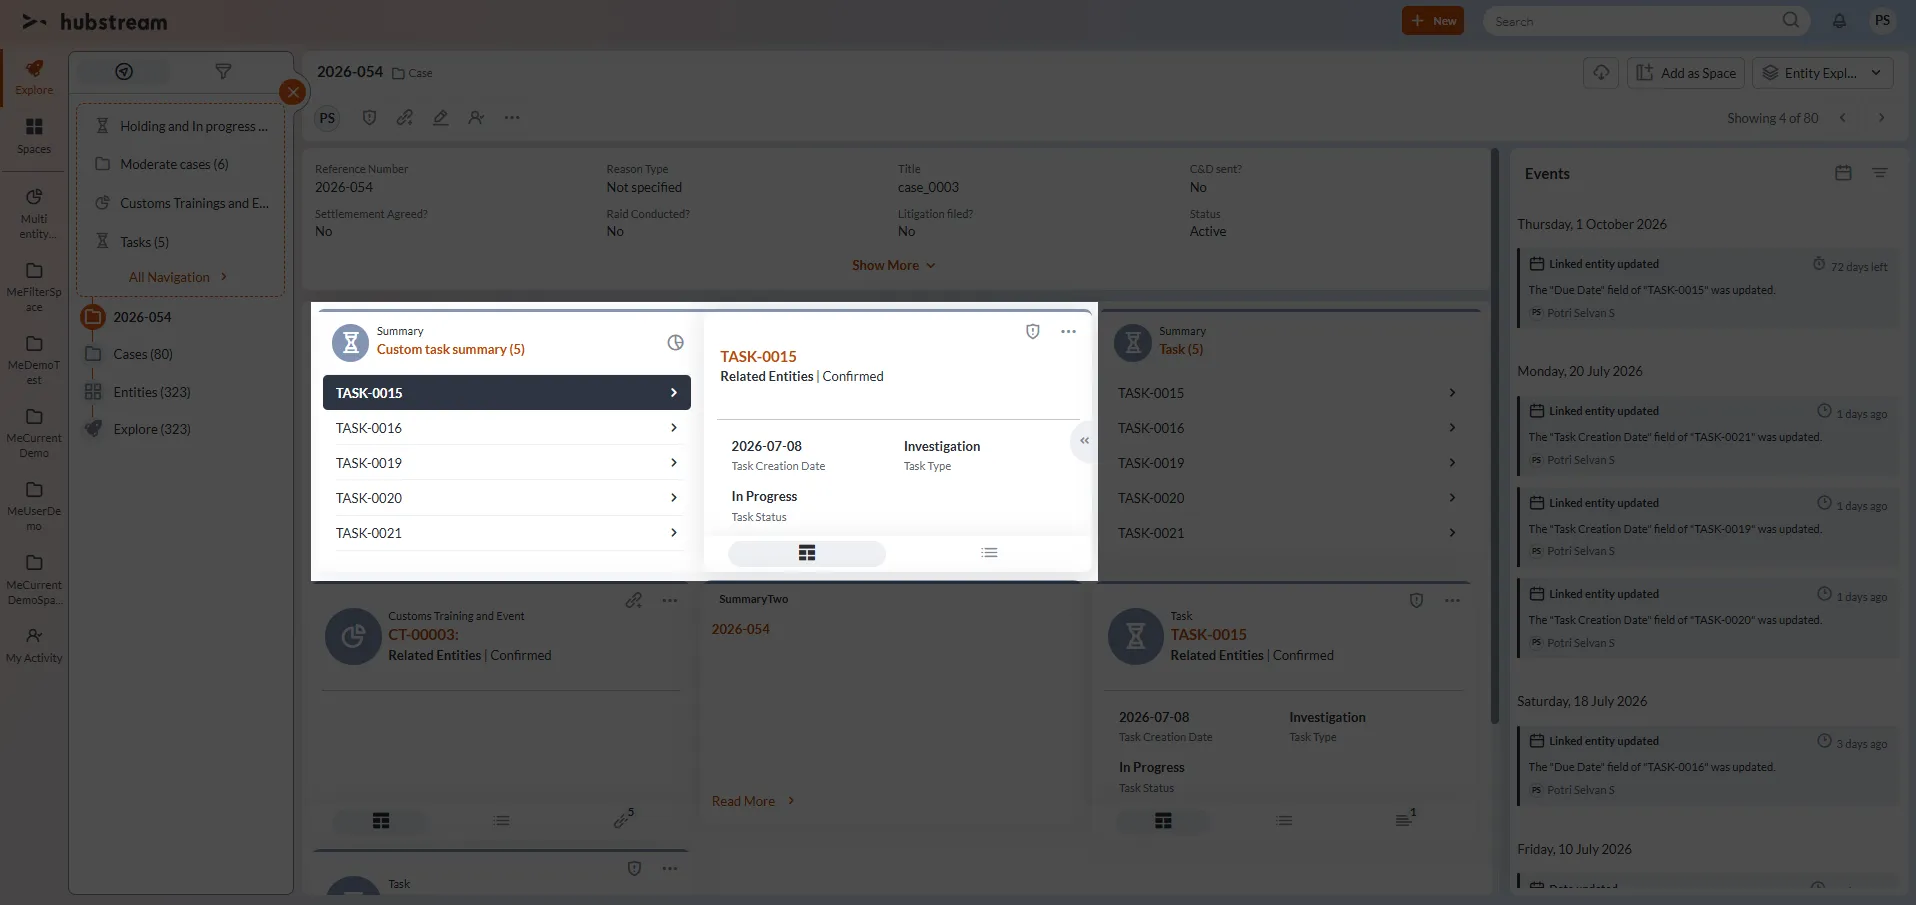
- Each Task is displayed with a Navigate Right arrow.
- Selecting the Navigate Right arrow opens the corresponding Task entity details by expanding the summary tile.
- The user remains on the current Case Entity Explorer page and is not redirected to a separate detail page.
- The Summary Tile is not displayed when no linked Task entities are available.